Showing posts with label web publishing. Show all posts

Wednesday, June 11, 2008

SEO Guidelines

You ask, we are photographers, what does SEO have to do with us? My answer is simple: If you want anyone to find your photography, which is assumedly why you posted it on the web, then SEO is important to you. If you don't know, SEO stands for Search Engine Optimization and has long been the challenge of web developers to find an easy way for the creation of web site that everyone will see.

I stumbled across an article on 10 SEO Rules for Designers. There are many good ideas for us photographers as we create our own sites.

I hope this helps you get noticed on the web! ... Read More!

Don't forget to visit my photography web site where we sell museum quality black and white prints framed to last up to 175 years - Outdoor Images Fine Art.

Monday, May 19, 2008

Web Workflow

This Web Workflow involves creating a web page to publish or distribute on CD. Similar to the Slideshow Workflow, this workflow is Lightroom specific. This workflow discusses various methods to use Lightroom Web Templates to maintain web pages and web sites. For very specific template information, we will refer you to additional resources.


  1. Creating and Maintaining Web Galleries

... Read More!

Don't forget to visit my photography web site where we sell museum quality black and white prints framed to last up to 175 years - Outdoor Images Fine Art.

Managing Lightroom Galleries on the Web

This is part of my Web Workflow using Adobe Lightroom.

Adobe Lightroom is such an efficient tool, I developed a method for managing the web sites I create so that updates are available with minimum fuss and little manual work. The hard part is creating the first page or gallery. After that, maintenance is easy!

Using Collections in the Library Module and Templates in the Web Module are the keys to managing your web sites through Lightroom. We will discuss the creation of a gallery and then the maintenance plan showing each step along the way.

Creating the Collection For the Gallery

By now you have probably already created a gallery and tested it so that you have something to look at. Bear with me and follow these steps to create a new gallery so that it will be easy to update.

First, use the Library Module and select a group of images that should be shown in a single gallery for your web site. Use the SHIFT key to select multiple images in a row and the CRTL key to select images that are not immediately next to each other. With these images selected, go to the left panel and expand the Collections Pane. Be sure not to click on any of the collections.

As an alternative method, and one I prefer, clear the Quick Collection by pressing and holding the SHIFT and ALT keys and then pressing the B key. Then, click on each photo to add to the gallery and press the B key. Do this for each individual or group selection of images. You can find photos, scroll around and not worry about de-selecting some of the images. When you are done, click on the Quick Collection under the Library Panel and select all the photos before proceeding to the next step. This time you can click the first photo and SHIFT click the last photo or use the Edit, Select All menu item (CTRL-A is the shortcut for that menu item).


You can either click on the plus sign contained in the Collections Panel header, or


right-click on any of the existing collections and choose either a) create collection or b) create collection in xxxx. The first item will create a new collection at the base level and the second menu item will create a collection contained within an existing folder. When you choose one of these options, or press the plus sign as shown above, you get the following dialog box:


Note that there are three check box choices after inputting a collection name. They are:
  1. put inside xxxx
  2. include selected photos
  3. make new virtual copies

Check the first item to include it under the already highlighted folder or the folder you right-clicked on. Check the second item to include the photos we selected in the first step. Check the final item to make virtual copies of the images before adding them to the collection.

My preference is to use virtual copies in a collection so that I can change the development look, the cropping, the description and any of the other meta data for the purposes of the gallery. Also, virtual copies take up very little room on the hard drive.

Using this method you can organize your collections under folders. For example, you can create a "collection" titled, 'My Web Site.' To do this, open the Create Collection dialog box and de-select the checkbox to include the selected images. This will create a collection with no images in it which is the same as a folder. Then, right-click on the newly created collection, 'My Web Site' in this example, and create a collection underneath it. For example, create the collection, 'My First Gallery.'

Setting Up the Web Web Gallery

After creating the collection of images, go to the Web Panel and select a web gallery to create a web page with. Change all the settings and colors until achieving the look for this gallery. The images should be previewed on the screen.


If you haven't created a template shortcut under the Template Browser Panel then go ahead and do so. This is done by clicking the ADD button at the bottom of the left hand pane or by right-clicking in the Template Browser Panel just like we did working with Collections. For example, you could name this one 'My First Web Gallery.'

After adding the new Web Template and storing the settings, perform the upload to your web site.

Now you have a published Web Gallery that can be viewed and used. So what do we do when we want to change the images?

Maintaining the Web Gallery

To maintain the Gallery we only need to perform the following steps:
  1. Select additional images
  2. Add them to the Collection
  3. Remove any images desired from the Collection
  4. Call up the Web Template saved
  5. Upload the changes

So, first go to the Library Module and select the collection we used to create the web gallery. In our example, we called it 'My Web Site'. Review the images to see what might need added. Then find those images in the Library and drag the image to the collection on the Collections Panel. If there are many images, you can use the Quick Collection as shown above. Just add the new images and drag them all to the 'My Web Site' collection.

Now review the total collection again and remove any of the images you no longer want in the gallery. There are two ways to accomplish this. First, you can right-click on an image in the Collection and choose the 'Remove from collection' menu item as shown here. If you added virtual images to the collection as I prefer to do, then you can delete the image because it is not an original image and it shouldn't be used anywhere else. This is done by clicking on the image and hitting the DEL key.

Once this is done, move to the Web Module and click on the Template Browser panel. Click on the template saved for the web gallery. In our example this was 'My First Web Gallery.' All of the preset choices should be loaded.

If you make any changes to the layout or colors, be sure to save them with the template. Do this by right-clicking on the template name and choosing the update menu item shown below.


This saves all the current settings and updates the template for the next time.

Before uploading the site, check the FTP settings. If you created presets for the FTP Uploads then select that item. I prefer to create an FTP preset for each base web directory and each gallery subdirectory. This prevents me from having to remember each and every individual web directory.


After uploading your site, view it in your internet browser to see the changes.

Conclusion

This is all it takes! Carefully setting up the collections and web gallery templates the first time makes maintenance a breeze. Even if you totally switch out the portfolio for different images, all the settings are there ready to go. Quick Collections are a must for anything more than a few pictures to add or create a collection with.

NOTES

If your web site has various subdirectories that get regularly updated, consider creating additional FTP presets. For example, if all your photo galleries are in a sub directory called 'photos' then create a second FTP Preset called 'My Web Site Photos' and set the directory to 'ftp://www.mydomain.com/photos'. This will allow you to easily add content without having to remember the subdirectory.
... Read More!

Don't forget to visit my photography web site where we sell museum quality black and white prints framed to last up to 175 years - Outdoor Images Fine Art.

Thursday, May 8, 2008

LRG Releases Beta for Lightroom Paypal Site


Lightroom Galleries has released it's long awaited Lightroom Web Gallery template for creating a complete web site that includes purchasing prints through paypal! The name of the Lightroom template is: LRG Complete. The Complete stands for generating a complete web site. The template consists of three Lightroom Web Galleries that are fully customizable to your own color themes and taste. The three templates complement each other and work to create a fully functional web site for photography. If you don't have a paypal account or don't want to sell your work, you can still use this template to show your work.

Demo and Download

Visit the LRG Demo Site to see a live demo of the finished product. Visit the Beta Download Announcement to download the Beta version.

LRG has worked hard on this first release and has been known for the last release (LRG Complete 1.1) as developing a quality template. Remember this is a Beta version and is subject to bugs and improvements before a final version is released.

Stay Tuned!


Keep tuned here and we will continue to bring you news about this release. Thanks to Lightroom Galleries!

More Screenshots


... Read More!

Don't forget to visit my photography web site where we sell museum quality black and white prints framed to last up to 175 years - Outdoor Images Fine Art.

Sunday, May 4, 2008

TTG MonoSlideShow Template - Using AutoPlay Correctly

The Turning Gate continues to update and publish superb Adobe Lightroom web galleries. While there are several flash enabled components available for Lightroom, one that I use is MonoSlideShow. The Turning Gate has created a Lightroom web template to create a MonoSlideShow called TTG Monoslideshow Gallery.

Unfortunately, due to the way Lightroom and this template work together, creating an Autoplay MonoSlideShow is tricky. Here I show you several ways to create one.

If the Autoplay item is checked in this template and the slideshow is running an export or upload will hang. Lightroom will indicate it is checking the FTP connection and stop there forever.

There are three ways to sucessfully create an autoplay monoslideshow. One involves mannually editing the resulting monoslideshow.xml file, one involves using the controls and having them hide and the third involves a trick I discovered.

Editing the XML File


First, you the template can be setup with all the parameters customized. Review the slideshow by checking Autoplay in the Main Gallery Attributes under the Site Info panel. Once the slideshow works as desired, remove the check from the Autoplay checkbox. Then export or upload the template as desired. Finally, edit the file labeled monoslideshow.xml. In the first few tags is an tag labeled autoplay. Edit this tag as follows:

autoplay="true"

Save the file and run the template. Note that you may need to restart apache or IIS in order for the slideshow to update in a browser. This method works, but involves editing after the fact. I prefer a more automated solution which works perfectly after an upload to a web site.

Using the Control Auto Hide Feature


The second option is to set the Control Options under the Appearance Panel to autohide the controls after the slideshow starts. Set the slideshow to play using the control shown in the preview. Then select the checkbox enabling the control to auto hide. Export or Upload the template as normal. The slideshow will start with the controls showing which will soon disappear for the remainder of the slideshow.
This method works with no further editing, but if you don't want the annoying control panel to show and just want a slideshow to run, this solution may not work.

Bypassing the Error in Lightroom


Setup the slideshow to run correctly using the Auto Play checkbox. Leave the slideshow running and press the export or upload button. The export or upload will hang as shown below:

Then, remove the check from the Auto Play checkbox. Finally, press the small 'x' next to the hung process in Lightroom to cancel that process. It will begin cancelling and a second process will commence as shown below.

This second process is the export or upload and it will complete correctly. Check out the slideshow and it will automatically being playing.
... Read More!

Don't forget to visit my photography web site where we sell museum quality black and white prints framed to last up to 175 years - Outdoor Images Fine Art.

Wednesday, March 26, 2008

The Turning Gate Galleries

The Turning Gate has created some fantastic galleries that easily install into Lightroom and make creating web site work much easier. Today we will look at the Auto Index template which automatically loads albums as they are published. This previously manual work has now been automated.

First, download the template and install it according to the directions from The Turning Gate. You can see an example of the template in action here.

This is an example used on my wordpress site. However, I had to modify the code somewhat. I use SUSE Linux 10.3 and apache 2.2.4 with the most current version of PHP. However, when I used the template without modification, I was getting the PHP code as the name of the album with no picture or other text shown.

The fix was relatively easy. Find the directory where you installed the template and edit the index.php file. Go down to the bottom where the html is being written in the div tags. Replace the following code:

<?=

with new code:

<?php echo

Be sure to put a semi-colon at the end of each item before the closing tag. See the following example for the complete code:

< div class="albumBox">
< div class="albumBoxContent">
< div class="albumThumb">
< img src='<?php echo $albums[$i]['thumbnail']; ?>' class="thumbImg" title='<?php echo $albums[$i]['title']; ?>' alt='<?php echo $albums[$i]['title']; ?>' />
</div>
< div class="albumDescription">
< p>< strong><?php echo $albums[$i]['title']; ?></strong>< /p>
< p><?php echo $albums[$i]['description']; ?></p>
</div>
< div class="albumLink">
< a href='<?php echo $albums[$i]['url']; ?>'>< span>Open Album</span></a>
</div>
</div>
</div>


That's all there is! Save the file and then restart Lightroom. After that change, the auto index template worked perfectly for me. I uploaded another album to a subdirectory from the auto index and following the rest of the directions from The Turning Gate, all worked perfectly!

Thanks TTG for a great set of templates!
... Read More!

Don't forget to visit my photography web site where we sell museum quality black and white prints framed to last up to 175 years - Outdoor Images Fine Art.

Wednesday, March 19, 2008

UPDATE FOR 2.5: Using SlideShowPro in WordPress

UPDATE for Wordpress 2.5 is at the bottom of this post.

If you are looking for a way to put a SlideShowPro presentation in a WordPress web site, this tutorial is for you. See an example of this working below:
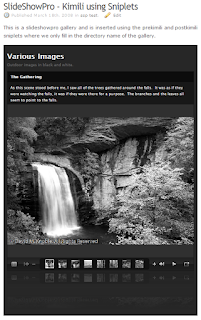
SlideShowPro is a fantastic plugin for Lightroom which provides the framework to effortlessly create gallaries and albums of your images. See the quick review we did of SlideShowPro.

After you create a web based gallary, you will want to publish it for others to view. We use WordPress for our own site. Like other web based packages, security updates have provided a challenge for creating script content that will be allowed to run.

WordPress Web Site Platform

WordPress is written to run in Apache and we use SuSe Linux as our platform for Apache. While WordPress was developed as a blogging platform, the ease of customizing the entire site lends WordPress the ability to host a good website as well. Considering my lack of PHP understanding and the wealth of administrative functions available through a web interface, WordPress is perfect for my uses.

At the time of this writing, the current version of WordPress, 2.3.3, does not easily allow scripts to run by itself because of enhanced security patches. While there are various plugins available to force html to remain as input for a post or call a library to run a flash presentation, I have had the best luck with the Kimili Flash Embed Plugin and below we discuss a method to ensure the SlideShowPro flash presentations will run well on WordPress. You can download the plugin here .

Placement of the SlideShowPro Gallery

SlideShowPro creates galleries and albums. It does not allow for customized headings, footers, links and buttons. Although SlideShowPro does allow you to add a logo or other graphic file and attach a link, we wanted to integrate our photos into a site seamlessly.

In order to keep the look and feel of our website, we have decided to place gallery showings in our posts and pages. This will allow our headings and menus to show right along with our images. This means we need to type some HTML code into the blog post or page in order to grab the presentation and show it in the browser with the rest of the site. The well written SlideShowPro manual provides us the steps to do this.

Requirements

In order to use our method to insert SlideShowPro results into WordPress, the following software is required:
  1. a working copy of WordPress
  2. the Kimili Flash Embed plugin for WordPress
  3. the Sniplets Plugin for WordPress
  4. Adobe Lightroom with SlideShowPro installed.

WordPress Preparation

First, install and activate both the Kimili and Sniplets plugins in WordPress. For instructions on how to install and activate WordPress plugins, see the WordPress web site on Managing Plugins. After activation, be sure you have created a SlideShowPro gallery or album and uploaded it to your WordPress site.

Our WordPress directory structure is as follows:
  • --www.domain.com
    • --wordPress
    • --pf (short for portfolios)
      • --slideshow1
      • --slideshow2
      • --slideshow25

While your directory structure may be different, you may need to adapt the path statements in these instructions to your setup.

SlideShowPro Adjustments

After preparing WordPress, we will adjust the SlideShowPro gallery that was uploaded to the web site. Per the SlideShowPro manual, inserting a SlideShowPro gallery in a web page is done in several steps:
  1. we have to copy the javascript library to the root directory of our web site.
  2. we have to place a piece of code in the head tag of the page that let's apache know where the javascript library will be.
  3. we have to insert the code to run the gallery in our web page.
We are going to substitute step three with placing the correct code in a post or page in WordPress to allow the flash presentation to show on screen. Below we perform the first two steps.

Copying the Javascript Library


If the root of your domain is www.domain.com, then create a directory called js (lowercase) and copy the file swfobject.js to this directory. This file can be found in the root directory of any slideshow you created with SlideShowPro and uploaded to your web site. Using our directory structure that would be Slideshow1 or Slideshow2.

Creating and Installing the Script Path Statement


The statement that needs added to the head section of each web page is as follows:

[script type="text/javascript" src="http://www.doamain.com/js/swfobject.js"][/script]

Note that the brackets in this code must be replaced with greater than and less than signs in typical html coding. Also note that this does not get added to the heading that shows up on the web site, but rather contained in between the head and /head tags. To do this in wordpress, we will use the Sniplets plugin. We will also use this plugin later on to view the slideshow. You can edit the theme of your WordPress site to include this code, but then changing themes will lose the scripting code. We chose Sniplets so that changing themes would continue to work.

Create a Sniplet with the script path code above. Call it anything you would like that will help you identify it later. I call mine SlideShowPro Lightroom Script for Themes in Header. Now set this Sniplet module to be put at the top of every page. This will put it at the top of the theme and even though it is outside the tags, it should work. If you have trouble with this, you can always edit your theme and add the code in the Heading.php file.

Creating the Post Containing a SlideShow

Now we are ready to add a SlideShowPro presentation to a post or page. Create a new page and title it Test of Flash Gallery. You can delete the post later after you are comfortable with how this works. We will be inputting code from the index.html page that SlideShowPro created per the SlideShowPro manual, but we reformat it to fit the syntax of the Kimili plugin.

Note that the SlideShowPro manual indicates we should find the index.html page within our presentation and open it for editing. There is very little code in the page, but there are two comments that indicate we should copy what is between those lines to move the presentation to another HTML page. See the image below.
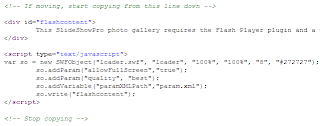

Find this code and copy it to a text file you can save for future reference or print it out to have it in front of you as we complete this tutorial.

Basically we will take this javascript code and put the same tags into the Kimili plugin format. By entering this code straight into our post or page, WordPress will run it through the plugin and the plugin will provide the presentation. Be sure you are using the html or code editor and not the WYSIWYG editor so that your code will be properly input.

First insert the html code with the paragraph tags and customize the text to indicate that Flash must be installed on the computer. This text will show only if the flash presentation cannot be seen. Then, input the code below to access the Kimili plugin and run the presentation.

[kml_flashembed movie="http://www.domain.com/pf/slideshow1/loader.swf" height="700" width="500" quality="best" bgcolor="#272727" fvars=" paramXMLPath = param.xml ; xmlDataPath = images.xml " base="." /]


Let's review each piece as it relates to your slideshow. Each of these tags represents one of the items created by SlideShowPro. Read the code you took out of your index.html from your presentation. Use that information to fill in your tags.

  • movie-this is the URL to the loader.swf file created by SlideShowPro. Use the complete URL as shown above.
  • height - the height in pixels (e.g. 400) or percentage (e.g. 100%) of the flash presentation.
  • width - the width in pixels (e.g. 400) or percentage (e.g. 100%) of the flash presentation.
  • quality - the quality assigned by SlideShowPro, leave as best
  • bgcolor - the background color as shown in the file by SlideShowPro
  • fvars - other variables needed by the presentation. See the Note below.
  • base - the base of the directories to access the files defined in the fvars tag. This should always be a dot or period.

VERY IMPORTANT: I got stuck on the tags and was only getting a black or grey box. The syntax of the tags used in the Kimili plugin does not seem to be picky except for the fvars tag. That particular tag must have the following convention:

fvars=" paramXMLPath = param.xml ; xmlDataPath = images.xml "

While it is difficult to show in this post, there must be spaces between each item within the quotes including the equals sign and the semi-colon. I do not know why, but without the spaces, the code on my machine would not execute. It may have something to do with parsing each item.

Finished!

That's it! Press the publish button for your post and view the site. Your presentation should be showing.

A few tips:
  • If you get a colored box in the post without the pictures, your tags need adjusted.
  • If you see a partial picture or the picture extends past the margins of your posting area, set the size smaller in SlideShowPro and regenerate the portfolio and ftp it to your site. You should not have to change anything else.
  • If you cannot see pictures, be sure you have the base tag included with a dot. This tells the presentation that the parameter and image files are in the same directory as the rest of the presentation.
  • For that matter, be sure all the tags above are included.
  • If you cannot see changes as you adjust your tags, check your caching in the web site. If you have any caching turned on in your web site, you may want to disable it until you have finished this tutorial. That way your changes will be immediately updated and you can view the results. You may turn on your caching after you are finished and happy with the results.
  • You can add additional text in the post prior to and after these tags and it will show seamlessly with the presentation

Using Sniplets

After I got the code for the Kimili tag working, I decided to try and make it easier to add in my posts and pages. I created two sniplets called PreSSP and PostSSP. In the first sniplet I copied all the code up to the name of my slideshow containted in the movie tag. In this case that was slideshow1. This included the slash before the slideshow. Then in the second sniplet I copied the code from the name of the slideshow until the end. Now we have our own custom HTML tags. You can easily add another slideshow to a post or page using the following code:

[sniplet PreSSP]slideshow25[sniplet PostSSP]

If you include the custom paragraph with the text indicating flash must be installed in your first tag, PreSSP, then the post will be complete.

Conclusion

It has taken me almost a week to figure this out. It is also possible that future releases of WordPress may break this functionality. As of this writing, version 2.5 of WordPress is in beta testing. I have not had a chance to test it yet. Let me know how this tutorial works for you and if you find any errors, let me know so I can fix them.

UPDATE: I am using version 2.5 of Wordpress now and the Sniplet plug-in does not let you edit or change the sniplets. You can use mySQL and edit the database directly. I have not seen an update to the Sniplet plugin yet, so I don't know if there will be one. I have also seen some security concerns regarding sniplets although I have tight directory security, so I don't know if I need to worry. HOWEVER, you do not need sniplets for SlideShowPro to work in Wordpress, it just made everything easier. ... Read More!

Don't forget to visit my photography web site where we sell museum quality black and white prints framed to last up to 175 years - Outdoor Images Fine Art.

Monday, March 17, 2008

SlideShowPro Plugin

I found a plugin for Adobe Lightroom that is a must have for anyone that wants to publish pictures on the web. The settings and capabilities of Adobe Lightroom are great, but this plugin takes it to the next level. Dominey Design has outdone themselves. See a preview from my website (under construction) showing SlideShowPro in action.


This is completely done in flash. More importantly, there are more settings than you can possibly imagine. You can choose all the colors, styles, what is showing or hidden, what data fields are used, custom sizes, hyperlinks, add logos, etc.

This control lets you toggle between full screen and normal sizing - on the fly. There is also an equally impressive gallery list that does not require much work to use. Also notice the wet floor look which can be toggled on and off. It maintains a reflection that changes with each image showing. This is truly well done.

The manual is very well written with examples showing how to use advanced features such as publishing within an existing web page and publishing multiple albums in a gallery window. Luckily, only a few items require extra work and they are not necessary to publish an album. There is also an extensive forum available to help with any questions or support.

All the ftp and export settings in Lightroom work, so you can publish your work straight to your website from within Lightroom.

You can buy SlideShowPro for Lightroom for only $25US and paypal is accepted with immediate download. If you want to try the plugin first, there is a great trial version that just stamps the pictures with a demo message, but is fully functional.

NOTE: As I get my website up and functional, I will a) post a link so you can view it and b) put together some tutorials for how to use SlideShowPro and how to customize it within the web framework.

Thank you Todd!
... Read More!

Don't forget to visit my photography web site where we sell museum quality black and white prints framed to last up to 175 years - Outdoor Images Fine Art.