Showing posts with label how to. Show all posts

Saturday, December 8, 2012

Using Multiple Catalogs in Lightroom

This article covers the Metadata section of the Smart Collections Workflow and is part of the complete Smart Collection Workflow for Lightroom.

While it has been awhile since I have added more content to the workflow, time has helped the cause. Adobe Lightroom has continued to improve the workflow characteristics of this great photographer's tool since I began using Lightroom 1.0. As of this current version (4.x), I have really spent more time refining how I work on my catalog in the off hours. Since I have full time self-employment and a family, the time I get in front of my iMac is less than in front of my macbook pro. This made finding a method of editing photos already in my catalog paramount to continuing my photography work.

Luckily, there is a simple way to work on parts of my catalog remotely and then merge the changes back into my main catalog.  I use only a few built-in Lightroom commands to accomplish this feat.

... Read More!

Don't forget to visit my photography web site where we sell museum quality black and white prints framed to last up to 175 years - Outdoor Images Fine Art.

Wednesday, August 20, 2008

Essay: Thinking in Themes

In keeping with the work we are doing on the Photographer's Eye, I wanted everyone to see this essay from the Luminous Landscape contributed by William Neill on Thinking in Themes. William's 25 year experience is captured in his esssay as he tries to bring focus to the photographer. This focus, William says, will help produce a series of meaningful images that go together. Take a moment and review this essay and his portfolio links at the end. ... Read More!

Don't forget to visit my photography web site where we sell museum quality black and white prints framed to last up to 175 years - Outdoor Images Fine Art.

Thursday, July 31, 2008

Lightroom Tip#17: Speeding Up LR 2.0 Catalogs

So you have updated to Adobe Lightroom 2.0? Oh, but you don't have the money to update your computer? Here's a quick overview of the Lightroom 2.0 Catalog settings, which aren't remarkably different from Lightroom 1.4.1. However, with a few tweaks, even your older processor can run Lightroom catalogs a little faster. The really good news? These tweaks will work with Lightroom 1.4.1 as well! First, let's look at where the settings moved to.

In Lightroom 1.4.1, the Catalog Settings were under the File menu. In Lightroom 2.0, Adobe moved them to the Edit menu with the other Preferences.


Optimization

After you access these settings, the first tab is the General settings tab. Notice the bottom section on Optimizing. This is where you can have Lightroom reorganize your catalog data file. It doesn't do anything special that you can see, but it does rearrange how the data is stored to make it more efficient to access. Think of it as a routine like disk defragmenting. Do it every so often to keep things running smoothly. You can even see the last date your catalog was optimized in the top section of the General tab. It depends on the size of your catalog, but the larger the catalog and the more often you make changes to data, the more often you might want to optimize your catalog.


Oh yeah, don't forget one of the cardinal rules: BACKUP THE CATALOG BEFORE YOU OPTIMIZE IT! You never know about the power company or some other gremlin. This is good practice anyway.

Preview Size and Quality

The second tab in the Catalog Settings is the File Handling tab. Here we determine what size and quality our 1:1 previews are rendered as. Do you have an old or slow video card? Does it take longer than it should to show the 1:1 previews? If it does, then change the size and type of the preview. The image below shows the options for the preview size in pixels. The highlighted choice is the default. You can see that you can lower the size a little. Of course the converse is also true, blazing video graphics? Enlarge the preview!


Next, take a look at your quality setting. I know, I want the highest quality too. But, if you want to speed up what you are doing, set the quality to a lower value. Again, the image below shows the default item selected.


Metadata Suggestions

One of the neat featurs in Lightroom is the ability to help you remember what you typed in the Metadata blanks. However, this feature can slow down your computer with a large database. The program has to search for ocurrences of that data field with typing similar to what you have already input. Sometimes this causes a delay in your typing and you have to wait while the computer catches up. Personally, I don't find this feature necessary for me in the Metadata fields, so I turn it off. Go to the last tab in the Catalog settings, aptly called Metadata. Uncheck the box as shown below.


Don't Forget to Restart!

As with any major setting changes, after you are finished, close down Lightroom and restart the program. This should reload all these catalog settings.

One more point, changing the 1:1 preview settings won't help you until you have new previews. When you have some time, like right before you go to sleep early one morning (all nighter, huh?), use the Library -> Previews -> Discard 1:1 Previews menu item. Then use the Render 1:1 Previews menu item in the same place. This should re-create your previews with the new settings.

Remember that these settings are for EACH catalog and not global. You will have to do this for all your catalogs to make a difference.

My Settings

I have a dual core 3.2mhz pentium with 4gb of memory for my main computer and a laptop with a dual core 2.0mhz pentium and 2gb of memory. I use the standard settings on my desktop and everything is reasonable, but on the laptop I find that rendering takes a little longer. While I am out of town shooting images, I use the smaller previews on the laptop and then when I move the catalog to my desktop, I increase the previews to a higher quality. This seems to work well for me. Leave me a comment and let me know what you find.

8/1/2008 EDIT:

Also remember that hardware is important and if you decide not to upgrade hardware, you should still remember to defragment your hard disk. For those that don't know much about this, your hard disk gets pieces of files out of order over time. Like a file cabinet that is no longer in alphabetical order, it's takes longer to find stuff. Putting the file cabinet back in order (defragmenting your hard drive) makes it quick to locate things again. Typically, a defrag program comes with your system tools on your operating system. I use Diskeeper 2008 because it does a great job of defraging my computer while it's not doing anything else.
... Read More!

Don't forget to visit my photography web site where we sell museum quality black and white prints framed to last up to 175 years - Outdoor Images Fine Art.

Wednesday, July 9, 2008

Backup, Import, Backup

There are so many details to think about when deciding how to store images, how to label image files, how to backup images and which images should be imported into a library program. This article discusses an overview for the method of getting images from a camera (or scanner) into a Adobe Lightroom while maintaining an appropriate level of backups. This article will not discuss the pros and cons of different media, but overview the need for using multiple medias as backups.

The title of this article is really the summary of the entire workflow. Backup, Import, and Backup again. The order is also important, but mostly because of a limitation of many digital camera interfaces today. This article was also developed based on some of the other detailed work done in importing images into Lightroom and to give a further framework in the Image Conversion Workflow.

The speed of many digital cameras is very slow when uploading images. Only a negative scanner seems slower. Be that as it may, Adobe Lightroom seems to magnify the slowdown when importing directly from a camera. Thus, the first step: Backup.

Backup

The first step in our workflow is to backup the images from the digital card. If you use a negative scanner, then the first step is to scan the image to a backup medium. In my case, the backup is a USB mirrored hard drive attached to my workstation.

I use a Leica DLux3 which is a remarkable pocket camera that takes RAW images. I use the SD card reader in my computer, insert the SD card and copy the images to my external hard drive. See the article I wrote on naming directories for digital negatives and slides to determine how you will organize the image files. This is the fastest method for copying images from a camera - no additional processing in between. Next, we import.

10/13/2008 EDIT: Also see the article that discusses Backing Up Rejects.

Import

The importing function in Adobe Lightroom is a powerful tool. With a little practice and some digging, many options are available through the import dialog. If you copied your images to a backup in the first step, then the import step should use the 'copy the files to a new location' option.

If the files are RAW then you can also check the option to convert the files to DNG. Adobe's Digital Negative format continues to undergo improvements. The two primary reasons to consider using DNG formats are a) Adobe has made the format open source and it should be around for a long time to come and b) DNG formats are smaller than RAW formats because of some lossless compression routines. For TIFF files, JPEG formats and others, the DNG format doesn't offer much, but for RAW files, DNG is worth a look.

At this point you can also choose a MetaData preset or create one on the fly. Thus, we can be importing images from a soccer game shoot and automatically set the photographer's information as well as the soccer match information in the MetaData. Presets for MetaData are like bulk copies. They instantly make an array of changes to a group of files while they are importing. This saves mutliple selections and later typing.Also, keywords can also be added at the import stage. Similar to the MetaData presets, images can have basic tags created to get started.

This is not to say that further refining will not be necessary. In fact, changes should be necessary. There should be some title and description information put in the MetaData for each image. There should also be some keywords that will apply to some images and other keywords for other informations. The point is that much of the repetitive information can be input easily for all the images. This is the whole idea of an efficient workflow.

Backup

The last section almost could have been labeled Import-Backup. The importing dialog is the perfect time to make a copy of the images for our last backup. Simply setting the end of the dialog to copy the files to a CD when finished will add some time to the process, but will provide us with a moveable copy that could even be stored off site.

The copy to CD routine in Lightroom 1.4.1 seems to copy the images to a temporary directory and then burn them to a CD. However, the temporary files are not removed from the disk directory. Yet, when you export a new set of images to burn to a CD, Lightroom removes those old files first.

Exporting to CD can be done at a later time, but backups tend to get delayed if they are not completed when the images are added to the library. Then you find yourself getting busy and wanting to review the images. Who needs another backup? Well, the first backup is on a hard drive and the working copy is on another hard drive. Hard drives are prone to eventual failure, or in my case, prone to electrical failure from lighting strikes. So, to truly protect your images, using a backup that can be separated and that is not prone to descrtuction like the others.

Conclusion

The whole point of this article is to let us sit back and evaluate our current import strategy. Using the concepts above we have several advantages. First, we make a quick copy of our images and secure the location they are stored. Then we import them using presets to save lots of typing and reviewing. Finally, we make another backup to a CD or DVD as the import is taking place.

Next, we will delve into the details and choices available in the exporting dialog. Stay tuned!! ... Read More!

Don't forget to visit my photography web site where we sell museum quality black and white prints framed to last up to 175 years - Outdoor Images Fine Art.

Friday, June 13, 2008

Lightroom 2: Cropping and Pixel Size

Cropping while maintaining a specific pixel size has been a continued hot topic on the Lightroom 2.0 Beta forums. After some exploration based on a post from Jao van de Lagemaat on the Lightroom Forum for the 2.0 Beta version, I found a way to show the pixel sizes directly on the screen while cropping. Here is an article to show you how to get that pixel size on your development module window setup.
http://www.blogger.com/img/gl.photo.gif
Add Image
First, bring an image up in the development module window. Then go to the View and View Options menu. See the example below:


After clicking on this menu item, you will get the following dialog:


Be sure to check the Show Info Overlay box at the top of the dialog. Otherwise, your changes will not show up. Second, go to the Image Info 2 section and change the bottom two items. Use the drop down box and select Cropped Dimensions and Megapixels.

There is no OK button, so just close the window.

Presto! You now see the size of the image in pixels and the combined size in Megapixels. Furthermore, when you crop an image, you can see the resulting crop in pixels without having to switch back to the Library module. See the example of an image crop in the Development window below:


While this isn't a fix for those that want to input an image density setting for cropping, it will allow you to get reasonably close with a little math, all on one screen.

Enjoy!

... Read More!

Don't forget to visit my photography web site where we sell museum quality black and white prints framed to last up to 175 years - Outdoor Images Fine Art.

Wednesday, June 11, 2008

SEO Guidelines

You ask, we are photographers, what does SEO have to do with us? My answer is simple: If you want anyone to find your photography, which is assumedly why you posted it on the web, then SEO is important to you. If you don't know, SEO stands for Search Engine Optimization and has long been the challenge of web developers to find an easy way for the creation of web site that everyone will see.

I stumbled across an article on 10 SEO Rules for Designers. There are many good ideas for us photographers as we create our own sites.

I hope this helps you get noticed on the web! ... Read More!

Don't forget to visit my photography web site where we sell museum quality black and white prints framed to last up to 175 years - Outdoor Images Fine Art.

Saturday, May 24, 2008

Backing Up Your Lightroom Templates

Adobe has created such wonderful efficiencies in templates that it is almost a crime not to use them. Considering the amount of time in creating and perfecting them, especially when it comes to Printing templates, backing up the templates is not only a MUST, it is the top item on your regular daily routine before morning coffee and breakfast. Failing to backup your Lightroom templates will only cause enormous pain one day when they are corrupt or deleted. The only item more important would be backing up images and catalogs.

To backup your Lightroom templates, find your template directory and copy the contents to another hard drive or a usb drive. Using the same location you backup your catalog and images is a good idea as well.

The template directories are typically found as listed below:

Windows XP
C:\Documents and Settings\username\Application Data\Adobe\Lightroom\

Windows Vista
C:\Users\username\AppData\Roaming\Adobe\Lightroom\

Macintosh
Users/username/Library/Application Support/Adobe/Lightroom/


NOTE: In Windows XP, the Application Data directory is usually hidden. You must enable “show hidden folders” in the folder options of the windows explorer before you can browse to that directory.

Backing up this entire base directory will get all of your Develop templates, Custom Text templates, Printing templates and all the other templates you have created. It will also backup your Web Galleries that you have downloaded and installed and the Web Gallery templates you have created to give your web site it's look and feel.

This is extremely important, do not forget to do it regularly!
... Read More!

Don't forget to visit my photography web site where we sell museum quality black and white prints framed to last up to 175 years - Outdoor Images Fine Art.

Monday, May 19, 2008

Managing Lightroom Galleries on the Web

This is part of my Web Workflow using Adobe Lightroom.

Adobe Lightroom is such an efficient tool, I developed a method for managing the web sites I create so that updates are available with minimum fuss and little manual work. The hard part is creating the first page or gallery. After that, maintenance is easy!

Using Collections in the Library Module and Templates in the Web Module are the keys to managing your web sites through Lightroom. We will discuss the creation of a gallery and then the maintenance plan showing each step along the way.

Creating the Collection For the Gallery

By now you have probably already created a gallery and tested it so that you have something to look at. Bear with me and follow these steps to create a new gallery so that it will be easy to update.

First, use the Library Module and select a group of images that should be shown in a single gallery for your web site. Use the SHIFT key to select multiple images in a row and the CRTL key to select images that are not immediately next to each other. With these images selected, go to the left panel and expand the Collections Pane. Be sure not to click on any of the collections.

As an alternative method, and one I prefer, clear the Quick Collection by pressing and holding the SHIFT and ALT keys and then pressing the B key. Then, click on each photo to add to the gallery and press the B key. Do this for each individual or group selection of images. You can find photos, scroll around and not worry about de-selecting some of the images. When you are done, click on the Quick Collection under the Library Panel and select all the photos before proceeding to the next step. This time you can click the first photo and SHIFT click the last photo or use the Edit, Select All menu item (CTRL-A is the shortcut for that menu item).


You can either click on the plus sign contained in the Collections Panel header, or


right-click on any of the existing collections and choose either a) create collection or b) create collection in xxxx. The first item will create a new collection at the base level and the second menu item will create a collection contained within an existing folder. When you choose one of these options, or press the plus sign as shown above, you get the following dialog box:


Note that there are three check box choices after inputting a collection name. They are:
  1. put inside xxxx
  2. include selected photos
  3. make new virtual copies

Check the first item to include it under the already highlighted folder or the folder you right-clicked on. Check the second item to include the photos we selected in the first step. Check the final item to make virtual copies of the images before adding them to the collection.

My preference is to use virtual copies in a collection so that I can change the development look, the cropping, the description and any of the other meta data for the purposes of the gallery. Also, virtual copies take up very little room on the hard drive.

Using this method you can organize your collections under folders. For example, you can create a "collection" titled, 'My Web Site.' To do this, open the Create Collection dialog box and de-select the checkbox to include the selected images. This will create a collection with no images in it which is the same as a folder. Then, right-click on the newly created collection, 'My Web Site' in this example, and create a collection underneath it. For example, create the collection, 'My First Gallery.'

Setting Up the Web Web Gallery

After creating the collection of images, go to the Web Panel and select a web gallery to create a web page with. Change all the settings and colors until achieving the look for this gallery. The images should be previewed on the screen.


If you haven't created a template shortcut under the Template Browser Panel then go ahead and do so. This is done by clicking the ADD button at the bottom of the left hand pane or by right-clicking in the Template Browser Panel just like we did working with Collections. For example, you could name this one 'My First Web Gallery.'

After adding the new Web Template and storing the settings, perform the upload to your web site.

Now you have a published Web Gallery that can be viewed and used. So what do we do when we want to change the images?

Maintaining the Web Gallery

To maintain the Gallery we only need to perform the following steps:
  1. Select additional images
  2. Add them to the Collection
  3. Remove any images desired from the Collection
  4. Call up the Web Template saved
  5. Upload the changes

So, first go to the Library Module and select the collection we used to create the web gallery. In our example, we called it 'My Web Site'. Review the images to see what might need added. Then find those images in the Library and drag the image to the collection on the Collections Panel. If there are many images, you can use the Quick Collection as shown above. Just add the new images and drag them all to the 'My Web Site' collection.

Now review the total collection again and remove any of the images you no longer want in the gallery. There are two ways to accomplish this. First, you can right-click on an image in the Collection and choose the 'Remove from collection' menu item as shown here. If you added virtual images to the collection as I prefer to do, then you can delete the image because it is not an original image and it shouldn't be used anywhere else. This is done by clicking on the image and hitting the DEL key.

Once this is done, move to the Web Module and click on the Template Browser panel. Click on the template saved for the web gallery. In our example this was 'My First Web Gallery.' All of the preset choices should be loaded.

If you make any changes to the layout or colors, be sure to save them with the template. Do this by right-clicking on the template name and choosing the update menu item shown below.


This saves all the current settings and updates the template for the next time.

Before uploading the site, check the FTP settings. If you created presets for the FTP Uploads then select that item. I prefer to create an FTP preset for each base web directory and each gallery subdirectory. This prevents me from having to remember each and every individual web directory.


After uploading your site, view it in your internet browser to see the changes.

Conclusion

This is all it takes! Carefully setting up the collections and web gallery templates the first time makes maintenance a breeze. Even if you totally switch out the portfolio for different images, all the settings are there ready to go. Quick Collections are a must for anything more than a few pictures to add or create a collection with.

NOTES

If your web site has various subdirectories that get regularly updated, consider creating additional FTP presets. For example, if all your photo galleries are in a sub directory called 'photos' then create a second FTP Preset called 'My Web Site Photos' and set the directory to 'ftp://www.mydomain.com/photos'. This will allow you to easily add content without having to remember the subdirectory.
... Read More!

Don't forget to visit my photography web site where we sell museum quality black and white prints framed to last up to 175 years - Outdoor Images Fine Art.

Wednesday, May 7, 2008

How To: Create a Keyword Hierarchy in Lightroom

Keywords are an extremely beneficial aspect of Adobe Lightroom and the larger the library, the larger the keyword list will be. Managing this list and keeping it efficient to use can be a challenge. Luckily, there are ways to organize and re-organize your hierarchy of keywords.

This article will not focus on the many ideas of which keywords to use, but will rather show you exactly how to create the hierarchy and modify it within Lightroom. See the article on methods of assigning keywords to see how to assign the keywords you create to individual or grouped images.

Lightroom can store multiple levels of keywords similar to the Folder panel above it in the Library Module. To create a hierarchy of keywords that you can group and drill down, plan it out on paper first. This will make creating the base keywords much easier. You can also create your keyword list in another program and import it. We will create another post on importing keywords in the future. First, let's create some in Lightroom directly. For this example, we will create the hierarchy Nature Location -> National Forests -> Pisgah.

Creating the Base Level

Creating the base level for a hierarchy involves inputting the base keywords. Simply click on the plus sign next to the Keyword Tags panel as shown below.


This will bring you to the Create Keyword Tag dialog box. Input one of your base keywords as shown in the image. Be sure to de-select the checkbox that allows you to include the selected images as attached to this keyword. If you are creating a base keyword, you will probably not have any images directly attached to that keyword. More on the results of the hierarchy later in this post.


You see we entered Nature Locations as the base keyword. After creating this base keyword, it is time to create our first sub keyword.

Creating Second and Subsequent Levels

We ultimately want our hierarchy to look like the image below. The base keyword is Nature Location and then we have sub-folders that show National Forests and then Pisgah.


To add a second or lower level keyword to the hierarchy, right click on the keyword to insert under. Then click on the menu item that says Create Keyword Tag inside xxxx. The same create keyword tag dialog will be shown. Enter the sub keyword and create it. It will be located underneath the base keyword. Continue in this manner to create the hierarchy you need.

Bottom Level Keywords

Notice that the Pisgah keyword in the image above has a bright gray triangle to the left of the keyword. This indicates that additional keywords are underneath Pisgah. I have further defined locations within Pisgah Forest as my bottom level keywords. These bottom level keywords have a grayed-out triangle next to them indicating no further keywords underneath them. These bottom level keywords will be the ones assigned to images.

Assigning Keywords

Now that we have a hierarchy of keywords that might be many levels deep in some cases, what keywords need assigned to an image? The answer is: Always the bottom level keyword!

Using our example, if you assign the keyword Pisgah to an image, then you can search for and find the image using all three keywords in the hierarchy: Nature Location, National Forests, Pisgah. (NOTE: I realize that I told you I had bottom level keywords under Pisgah, but for this example, we are using Pisgah as the bottom level keyword).

The keyword list is also useful. If you click on the Nature Location keyword, all images assigned to bottom level words under that hierarchy are selected. If you click on the National Forests keyword, only images that are assigned to bottom level keywords under National Forests are selected, and so-on.

Using bottom level keywords is important to a) keep your workflow as time efficient as possible - assigning one keyword instead of three in this example, and b) keep your meta database as trim as possible - for disk space, backup and speed considerations. Imagine having Nature Location assigned to 1,000 images that don't need it assigned in order to find the image!

Moving Keywords Around in the Hierarchy

Moving keywords around in the hierarchy is simple. Drag the keyword on top of the new word you wish to move it under. For example, if you have a base keyword as flowers and later want to move it under another keyword called plants, then drag the flowers keyword with the mouse until plants is highlighted. Letting go of the mouse will move the keyword. The assignment of the images to the flower keyword doesn't change, only the location in the hierarchy of the keyword itself. It really is that easy!

Now for the harder part. You can drag a sub-keyword and make it a base keyword by dragging your mouse all the way to the left of the list, outside the arrows. It will turn into a little sliver instead of highlighting a word. The keyword will be put at that level in the hierarchy. It works, but takes a little more dexterity.


Conclusion

Creating a hierarchy in Lightroom is easy to do and very important to efficiently organize and find your images. See the article on methods of assigning keywords to see how easy it is to drag and drop keywords for assignment or inputting them through forms and the keywording panel.
... Read More!

Don't forget to visit my photography web site where we sell museum quality black and white prints framed to last up to 175 years - Outdoor Images Fine Art.

Sunday, May 4, 2008

TTG MonoSlideShow Template - Using AutoPlay Correctly

The Turning Gate continues to update and publish superb Adobe Lightroom web galleries. While there are several flash enabled components available for Lightroom, one that I use is MonoSlideShow. The Turning Gate has created a Lightroom web template to create a MonoSlideShow called TTG Monoslideshow Gallery.

Unfortunately, due to the way Lightroom and this template work together, creating an Autoplay MonoSlideShow is tricky. Here I show you several ways to create one.

If the Autoplay item is checked in this template and the slideshow is running an export or upload will hang. Lightroom will indicate it is checking the FTP connection and stop there forever.

There are three ways to sucessfully create an autoplay monoslideshow. One involves mannually editing the resulting monoslideshow.xml file, one involves using the controls and having them hide and the third involves a trick I discovered.

Editing the XML File


First, you the template can be setup with all the parameters customized. Review the slideshow by checking Autoplay in the Main Gallery Attributes under the Site Info panel. Once the slideshow works as desired, remove the check from the Autoplay checkbox. Then export or upload the template as desired. Finally, edit the file labeled monoslideshow.xml. In the first few tags is an tag labeled autoplay. Edit this tag as follows:

autoplay="true"

Save the file and run the template. Note that you may need to restart apache or IIS in order for the slideshow to update in a browser. This method works, but involves editing after the fact. I prefer a more automated solution which works perfectly after an upload to a web site.

Using the Control Auto Hide Feature


The second option is to set the Control Options under the Appearance Panel to autohide the controls after the slideshow starts. Set the slideshow to play using the control shown in the preview. Then select the checkbox enabling the control to auto hide. Export or Upload the template as normal. The slideshow will start with the controls showing which will soon disappear for the remainder of the slideshow.
This method works with no further editing, but if you don't want the annoying control panel to show and just want a slideshow to run, this solution may not work.

Bypassing the Error in Lightroom


Setup the slideshow to run correctly using the Auto Play checkbox. Leave the slideshow running and press the export or upload button. The export or upload will hang as shown below:

Then, remove the check from the Auto Play checkbox. Finally, press the small 'x' next to the hung process in Lightroom to cancel that process. It will begin cancelling and a second process will commence as shown below.

This second process is the export or upload and it will complete correctly. Check out the slideshow and it will automatically being playing.
... Read More!

Don't forget to visit my photography web site where we sell museum quality black and white prints framed to last up to 175 years - Outdoor Images Fine Art.

Wednesday, April 30, 2008

Library & Catalog Management Workflow

Library & Catalog Management is about maintenance. This workflow involves moving files to permanent storage or on separate hard disk media and maintaining the image and keyword data in the Library. This is part of my Digital Image Workflow. Use the steps below as needed:

  1. Moving Image Files
  2. Periodic Keyword Maintenance
  3. Using a Catalog on another Computer
  4. Using Multiple Catalogs
  5. Catalog and Preview Storage Options
  6. Managing Multiple Sized Images of the same Image File
... Read More!

Don't forget to visit my photography web site where we sell museum quality black and white prints framed to last up to 175 years - Outdoor Images Fine Art.

Pre-Correction Image Workflow

After careful ratings, the best images should be prepared before the correction stage. The Pre-Correction Image workflow applies necessary crops and any touchup required. This is part of my Digital Image Workflow. Follow the steps below:

  1. Cropping an Image for future use
  2. Dust and speck removal
  3. Large scratches and object removal
  4. Red-eye removal
... Read More!

Don't forget to visit my photography web site where we sell museum quality black and white prints framed to last up to 175 years - Outdoor Images Fine Art.

Monday, April 21, 2008

Creating a Custom Contact Sheet in Lightroom


Creating a custom contact sheet like this one is easy to do in Adobe Lightroom. This type of contact sheet is especially important when using our film scanning workflows. We use this contact sheet to easily see what negatives are stored in specific binders allowing easy location of the originals. Here we will show you the steps to create your own contact sheet.

Where to Start

Begin by selecting some images. We use images by selecting a specific file folder where we store our images by either roll of film or roll of slides. See my article on Digital Management of Negatives and Slides.

After selecting some images, move to the print module. There select the lightroom template you wish to start with. We chose the 4x5 Contact Sheet. From there it is all customization.

Customizing the Contact Sheet

First we will set a title for our work. We need to allow room for a title to show, so we set the top margin in the layout tab to 0.75 inches. You can use any size that fits your needs. Then we set an identity plate that includes, most importantly, the file folder for the images. Remember from our workflow that the folder name is the identification for the series of images. In this case, the folder name is 2008-D-1. You can also use a description for the photo shoot if you like.

To change the identity plate, first select the checkbox for the identity plate under the overlays tab. Then click on the little down arrow at the bottom of the plate sample and select the Edit menu. Select the text identity plate option if necessary and type the description. Simply press the ok button without saving the identity plate, because it will change each time.

Next, select the Override Color checkbox and select a black color for the title. Be sure that the Render behind image and Render on every image checkboxes are turned off. Now you will see the identity plate in the middle of your contact sheet. Using the mouse, drag it to the top of the page. By setting your top margin, you should have ample space to show the title.

We also need to add a page number in case there are more images than will fit on a single page. Select the Page Numbers check box under the Page Options after the indentity plate. You should see the number one in the bottom right corner.

The only customization remaining is the text to show under each image. Check the Photo Info box and select the drop down Edit menu item. Here we will add the standard information we would like to see next to each image on the contact sheet.

This should bring up a dialog box similar to the one below. We will enter the filename and other information for each image. Note that you can choose whatever information you like, but you should choose the filename first if you will use the contact sheet as part of your archiving and storage workflow. This will help identify frame numbers and filenames later on.
By selecting information that you wish to show and pressing the insert button, the lightroom codes are input to the top and a sample filename is shown. Notice we use the Filename first and then any exposure information linked to the image. If the image is digital, then the exposure information exists. If you are scanning slides or negatives, this information probably doesn't exist and the filename is sufficient. Notice how we have added labels such as 'exposure' in the template area to describe the information added.

Be sure to press the drop down at the top of the dialog and select the 'Save current settings as New Preset' item. Then name it something meaningful like '4x5 contact sheet info'. Press Done and see what your preview looks like. It should be similar to the one presented at the top here.

Saving the Preset

Almost finished! Let's save what we have so far by adding a template. Press the Add button on the bottom of the left panel and enter a name similar to the one shown here. After you are finished, you can tweak the settings, right-click on the template name and select the 'Update with Current Settings' menu item.

Conclusion

Working with digital images from RAW sources or from negatives and slides still necessitates the printing of contact sheets. Set your up like this and easily add it to your work flow. ... Read More!

Don't forget to visit my photography web site where we sell museum quality black and white prints framed to last up to 175 years - Outdoor Images Fine Art.

Monday, March 24, 2008

Extra Files When Editing??

I was working on some portraits I took of my boys in Lightroom and after I edited them using NeatImage to remove some grain noise, I found extra files. Here's what happened.

I had been using my standard workflow, scanning some freshly developed negatives, importing them into Lightroom and burning a CD for backup. After assigning some additional meta data and new keywords, I began comparing some of the frames to see which expressions I liked the most.

I narrowed my view down to four images and found one that I liked both the expression and the eyes. My next step was to try and reduce some of the grain in the negative. Simple, I thought, I'll use the menu item to edit with a third party program - NeatImage. Since I hadn't made any changes to the development of the image yet, I used the Edit Copy rather than the Edit Copy with Lightroom Adjustments option.

It took a moment, but then I have 46 megabyte files on a network raid array, so that is expected. After finishing and returning, the sort order had changed on my photos. I keep lightroom set to order by the filename since I don't have all the exposure metadata when using film over digital cameras.

After looking deeper, I found that I had created four copies of images - one each of the four I was comparing. They all had the -Edit extension added to the filename.

The lightbulb went off! Lesson Learned: When you have multiple images selected in Lightroom and choose to edit them in an external program, Lightroom will make copies of all the images even if the program you access doesn't open them all! This behavior is good and expected as Lightroom's power involves work on multiple images at the same time. We just have to be aware of it!

Conclusion

Since I have been using Lightroom now for four months, I checked and found many instances where I had more -Edit copies than I thought. Use the Library module and access the Metadata panel on the left. Select the File Type and choose Photoshop Document. You may be surprised at all the extra files you find! ... Read More!

Don't forget to visit my photography web site where we sell museum quality black and white prints framed to last up to 175 years - Outdoor Images Fine Art.

Wednesday, March 19, 2008

UPDATE FOR 2.5: Using SlideShowPro in WordPress

UPDATE for Wordpress 2.5 is at the bottom of this post.

If you are looking for a way to put a SlideShowPro presentation in a WordPress web site, this tutorial is for you. See an example of this working below:
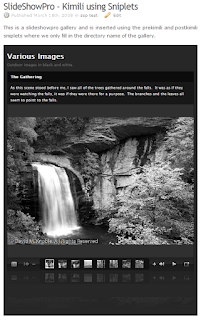
SlideShowPro is a fantastic plugin for Lightroom which provides the framework to effortlessly create gallaries and albums of your images. See the quick review we did of SlideShowPro.

After you create a web based gallary, you will want to publish it for others to view. We use WordPress for our own site. Like other web based packages, security updates have provided a challenge for creating script content that will be allowed to run.

WordPress Web Site Platform

WordPress is written to run in Apache and we use SuSe Linux as our platform for Apache. While WordPress was developed as a blogging platform, the ease of customizing the entire site lends WordPress the ability to host a good website as well. Considering my lack of PHP understanding and the wealth of administrative functions available through a web interface, WordPress is perfect for my uses.

At the time of this writing, the current version of WordPress, 2.3.3, does not easily allow scripts to run by itself because of enhanced security patches. While there are various plugins available to force html to remain as input for a post or call a library to run a flash presentation, I have had the best luck with the Kimili Flash Embed Plugin and below we discuss a method to ensure the SlideShowPro flash presentations will run well on WordPress. You can download the plugin here .

Placement of the SlideShowPro Gallery

SlideShowPro creates galleries and albums. It does not allow for customized headings, footers, links and buttons. Although SlideShowPro does allow you to add a logo or other graphic file and attach a link, we wanted to integrate our photos into a site seamlessly.

In order to keep the look and feel of our website, we have decided to place gallery showings in our posts and pages. This will allow our headings and menus to show right along with our images. This means we need to type some HTML code into the blog post or page in order to grab the presentation and show it in the browser with the rest of the site. The well written SlideShowPro manual provides us the steps to do this.

Requirements

In order to use our method to insert SlideShowPro results into WordPress, the following software is required:
  1. a working copy of WordPress
  2. the Kimili Flash Embed plugin for WordPress
  3. the Sniplets Plugin for WordPress
  4. Adobe Lightroom with SlideShowPro installed.

WordPress Preparation

First, install and activate both the Kimili and Sniplets plugins in WordPress. For instructions on how to install and activate WordPress plugins, see the WordPress web site on Managing Plugins. After activation, be sure you have created a SlideShowPro gallery or album and uploaded it to your WordPress site.

Our WordPress directory structure is as follows:
  • --www.domain.com
    • --wordPress
    • --pf (short for portfolios)
      • --slideshow1
      • --slideshow2
      • --slideshow25

While your directory structure may be different, you may need to adapt the path statements in these instructions to your setup.

SlideShowPro Adjustments

After preparing WordPress, we will adjust the SlideShowPro gallery that was uploaded to the web site. Per the SlideShowPro manual, inserting a SlideShowPro gallery in a web page is done in several steps:
  1. we have to copy the javascript library to the root directory of our web site.
  2. we have to place a piece of code in the head tag of the page that let's apache know where the javascript library will be.
  3. we have to insert the code to run the gallery in our web page.
We are going to substitute step three with placing the correct code in a post or page in WordPress to allow the flash presentation to show on screen. Below we perform the first two steps.

Copying the Javascript Library


If the root of your domain is www.domain.com, then create a directory called js (lowercase) and copy the file swfobject.js to this directory. This file can be found in the root directory of any slideshow you created with SlideShowPro and uploaded to your web site. Using our directory structure that would be Slideshow1 or Slideshow2.

Creating and Installing the Script Path Statement


The statement that needs added to the head section of each web page is as follows:

[script type="text/javascript" src="http://www.doamain.com/js/swfobject.js"][/script]

Note that the brackets in this code must be replaced with greater than and less than signs in typical html coding. Also note that this does not get added to the heading that shows up on the web site, but rather contained in between the head and /head tags. To do this in wordpress, we will use the Sniplets plugin. We will also use this plugin later on to view the slideshow. You can edit the theme of your WordPress site to include this code, but then changing themes will lose the scripting code. We chose Sniplets so that changing themes would continue to work.

Create a Sniplet with the script path code above. Call it anything you would like that will help you identify it later. I call mine SlideShowPro Lightroom Script for Themes in Header. Now set this Sniplet module to be put at the top of every page. This will put it at the top of the theme and even though it is outside the tags, it should work. If you have trouble with this, you can always edit your theme and add the code in the Heading.php file.

Creating the Post Containing a SlideShow

Now we are ready to add a SlideShowPro presentation to a post or page. Create a new page and title it Test of Flash Gallery. You can delete the post later after you are comfortable with how this works. We will be inputting code from the index.html page that SlideShowPro created per the SlideShowPro manual, but we reformat it to fit the syntax of the Kimili plugin.

Note that the SlideShowPro manual indicates we should find the index.html page within our presentation and open it for editing. There is very little code in the page, but there are two comments that indicate we should copy what is between those lines to move the presentation to another HTML page. See the image below.
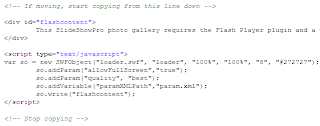

Find this code and copy it to a text file you can save for future reference or print it out to have it in front of you as we complete this tutorial.

Basically we will take this javascript code and put the same tags into the Kimili plugin format. By entering this code straight into our post or page, WordPress will run it through the plugin and the plugin will provide the presentation. Be sure you are using the html or code editor and not the WYSIWYG editor so that your code will be properly input.

First insert the html code with the paragraph tags and customize the text to indicate that Flash must be installed on the computer. This text will show only if the flash presentation cannot be seen. Then, input the code below to access the Kimili plugin and run the presentation.

[kml_flashembed movie="http://www.domain.com/pf/slideshow1/loader.swf" height="700" width="500" quality="best" bgcolor="#272727" fvars=" paramXMLPath = param.xml ; xmlDataPath = images.xml " base="." /]


Let's review each piece as it relates to your slideshow. Each of these tags represents one of the items created by SlideShowPro. Read the code you took out of your index.html from your presentation. Use that information to fill in your tags.

  • movie-this is the URL to the loader.swf file created by SlideShowPro. Use the complete URL as shown above.
  • height - the height in pixels (e.g. 400) or percentage (e.g. 100%) of the flash presentation.
  • width - the width in pixels (e.g. 400) or percentage (e.g. 100%) of the flash presentation.
  • quality - the quality assigned by SlideShowPro, leave as best
  • bgcolor - the background color as shown in the file by SlideShowPro
  • fvars - other variables needed by the presentation. See the Note below.
  • base - the base of the directories to access the files defined in the fvars tag. This should always be a dot or period.

VERY IMPORTANT: I got stuck on the tags and was only getting a black or grey box. The syntax of the tags used in the Kimili plugin does not seem to be picky except for the fvars tag. That particular tag must have the following convention:

fvars=" paramXMLPath = param.xml ; xmlDataPath = images.xml "

While it is difficult to show in this post, there must be spaces between each item within the quotes including the equals sign and the semi-colon. I do not know why, but without the spaces, the code on my machine would not execute. It may have something to do with parsing each item.

Finished!

That's it! Press the publish button for your post and view the site. Your presentation should be showing.

A few tips:
  • If you get a colored box in the post without the pictures, your tags need adjusted.
  • If you see a partial picture or the picture extends past the margins of your posting area, set the size smaller in SlideShowPro and regenerate the portfolio and ftp it to your site. You should not have to change anything else.
  • If you cannot see pictures, be sure you have the base tag included with a dot. This tells the presentation that the parameter and image files are in the same directory as the rest of the presentation.
  • For that matter, be sure all the tags above are included.
  • If you cannot see changes as you adjust your tags, check your caching in the web site. If you have any caching turned on in your web site, you may want to disable it until you have finished this tutorial. That way your changes will be immediately updated and you can view the results. You may turn on your caching after you are finished and happy with the results.
  • You can add additional text in the post prior to and after these tags and it will show seamlessly with the presentation

Using Sniplets

After I got the code for the Kimili tag working, I decided to try and make it easier to add in my posts and pages. I created two sniplets called PreSSP and PostSSP. In the first sniplet I copied all the code up to the name of my slideshow containted in the movie tag. In this case that was slideshow1. This included the slash before the slideshow. Then in the second sniplet I copied the code from the name of the slideshow until the end. Now we have our own custom HTML tags. You can easily add another slideshow to a post or page using the following code:

[sniplet PreSSP]slideshow25[sniplet PostSSP]

If you include the custom paragraph with the text indicating flash must be installed in your first tag, PreSSP, then the post will be complete.

Conclusion

It has taken me almost a week to figure this out. It is also possible that future releases of WordPress may break this functionality. As of this writing, version 2.5 of WordPress is in beta testing. I have not had a chance to test it yet. Let me know how this tutorial works for you and if you find any errors, let me know so I can fix them.

UPDATE: I am using version 2.5 of Wordpress now and the Sniplet plug-in does not let you edit or change the sniplets. You can use mySQL and edit the database directly. I have not seen an update to the Sniplet plugin yet, so I don't know if there will be one. I have also seen some security concerns regarding sniplets although I have tight directory security, so I don't know if I need to worry. HOWEVER, you do not need sniplets for SlideShowPro to work in Wordpress, it just made everything easier. ... Read More!

Don't forget to visit my photography web site where we sell museum quality black and white prints framed to last up to 175 years - Outdoor Images Fine Art.

Friday, March 14, 2008

New Noise Reduction Feature in Lightroom 1.4 Update

Adobe didn't make many large enhancements to their just released Update to version 1.4 outside of continuing to enhance the compatibility of RAW cameras and updates in Adobe RAW (now version 4.4).

However, they did make one very welcomed change to those of us that like black and white photography and the difference is outstanding. Adobe added the ability to use the Color noise reduction when developing images converted from RGB to greyscale. Obviously the Color information still existed after the conversion to greyscale, but Lightroom 1.3 disabled that control and only allowed Luminance noise reduction.

The image below shows the result of making the Color noise reduction available. The left side shows version 1.3 in Lightroom which had 100% of the Luminance noise reduction applied. See how grainey the image still is (click on the image to see a larger version). The image on the right has had 80% of the Color noise reduction applied. The difference is so great that, without using third party tools, the color layer noise reduction can be reduced and larger prints can be made without unacceptable grainey patterns in the print.


Previously, I had to export the image to a separate noise reduction software package, reduce the noise and return to Lightroom. In the process, I lost the RAW image to use for black and white because it was converted to a TIFF for outside processing (always make a copy of an image prior to editing in a third party program, including photoshop).

Once again, thank you Adobe!
... Read More!

Don't forget to visit my photography web site where we sell museum quality black and white prints framed to last up to 175 years - Outdoor Images Fine Art.

Installing Lightroom 1.4 Update

The Adobe Lightroom Update to version 1.4 is here and available for download. The windows version is about 48 megabytes, which is the same as the full install. Perform these steps to upgrade your version of Lightroom.

  1. Download the Windows Update or the Mac Update and save it to your hard drive.
  2. Find the downloaded file and run the application.
  3. It will ask where to unpack the files.
  4. Accept the default location and after unpacking, it will ask if you want to run the installation.
  5. Be sure the run install checkbox is checked and continue. You will be asked what language to perform the install. English should be the default.
  6. Click Next to begin the actual installation process.
  7. Click begin to start the process (a little redundant).
  8. Accept the license to continue.
  9. Accept or change the location of the files to match your current installation.
  10. The installation will begin copying files.
  11. When the copying is finished, you will see a completed dialog box.
  12. If you leave the checkbox checked you can start lightroom directly by pressing the finish button. Otherwise start lightroom like you normally would and you will see the upgrade was successful.

That's all there is to it! ... Read More!

Don't forget to visit my photography web site where we sell museum quality black and white prints framed to last up to 175 years - Outdoor Images Fine Art.

Printing in Lightroom using ICM with an Epson R2400

When you discuss printing in Adobe Lightroom you are liable to be met with a frown and an immediate discussion of how it doesn't work the way it should. There are many articles on the web and in publications that deal with printing. These articles give you step by step instructions with Lightroom and generic printers. Sometimes they even give you information on setting Epson printers.

After spending about four hours very late last night attempting to research the proper settings and match paper and ink to the screen, I have found the magic recipe for my printer. Thus, we will discuss the settings for the Epson R2400 to print in Adobe Lightroom using ICM. First, we will discuss the settings so that you can begin to print. Then, while your printer is working through the image, you can read about the research I did. Note that we will discuss black and white settings in another article as I have found those settings much more intuitive and easy to create.

First Things First - Prerequisites for ICM Printing


ICM stands for Image Color Management and uses what are known as ICC profiles. These are calibration profiles developed using standards from the International Color Consortium. For more information on these topics, follow the links provided.

In addition, your monitor must be calibrated. I use the i1Display2 by X-Rite also found as Gretag Macbeth Eye-One color management. The i1Display2 costs about $250US and will calibrate your monitor only - CRT, LCD and Laptop. There are many web sites where you can send a printout from your printer and have them create an ICC profile for you that I cannot justify more money for printing calibration hardware. This product is the best bang for your money.

You must also have ICC profiles for your printer and paper combination. Epson R2400 ICC profiles can be found on Epson's web site. Download these files and run them to extract the profiles to the proper place on your hard drive. Be sure to download the windows or macintosh versions appropriately.

Finally, your preparation includes being sure you have the most current printer driver. This is important to get new updates and my experience has been this is not done automatically. I purchased an Epson R2400 new in November of 2007. I used the CD included to install the driver. I have yet to receive a notice in windows indicating I have an update ready and I have not been successful determining the version of the software through any of the Epson control panels. That being said, I downloaded and installed the update from the web site and sure enough, it was a new version. The current driver for the Epson R2400 is also on their web site. Be sure once again to choose the appropriate operating system for your computer.

This completes our preparation. Open Lightroom and select an image for printing.

Lightroom Settings for Printing using ICM

Lightroom has a relatively simple interface for printing. Setting up the margins and print space in Lightroom goes beyond the scope of this article. We are dealing with only the printer settings. After setting the layout for an image, go to the bottom of the panel and view the Print Job Settings. Here is where we will tell Lightroom how to handle the color management for our image. Note that none of these selections alter what is viewed on the screen.

In order to print, we first set the Lightroom color management to Managed by Printer. This is a requirement. We will still use the ICC profiles, but we will select them through the printer setup.

Epson R2400 Printer Driver Settings

Next, press the Print Settings button to bring up the printer dialog. Press the Properties button to access the printer settings. In this example we are using 13x19 Velvet Fine Art paper. Set the paper type as shown in the image to the right.

Next, press the Advanced button if you are not already in the advanced mode.


These settings are extremely important. I have not found a reference to these settings in any print book or on the web. I think they are uniquely presented here.

When you open these settings, most of them are already set by default. If not already selected, select ICM color management. The mode should already be set to Driver ICM (Basic) as shown. In addition the intent should be set to Perceptual and the printer profile should be Epson Standard. Ignore the printer profile description for now as you cannot change it anyway.

Now select the check box for Show all profiles. This will enable all profiles on the computer to be available for selection. Use the drop down box under input profile and find ProPhoto RGB. This is the key to printing in Lightroom with the R2400.

Lightroom already uses this color space and although I have not been able to confirm it, if Lightroom is not managing the colors, it stands to reason that the ProPhoto RGB space is sent to the printer driver without manipulation. The results of my prints seem to confirm this is true.

After changing the input profile, the profile description at the bottom should match the ICC profile for the paper you have selected. In this case, our example shows the Velvet Fine Art paper correctly.

Using Print Preview in the Printer Driver Settings

While not required, I am trying to determine how accurate the Epson preview pane is. Thus, I have selected the checkbox for Print Preview. Many sources on the web have said not to trust this preview. However, it appears that the preview will tell you if what is being sent from Lightroom is close to what was on your calibrated (hopefully) monitor. It also appears through trial and error, that the preview will also show the modifications made by Lightroom if you chose to let Lightroom handle the color management. Thus, for now I trust it to show if I am in the right ballpark.

Saving the Preset Configuration in Lightroom

After making these changes, press the OK button on the printer driver dialog and then again on the printer settings dialog to return to Lightroom. Before doing anything else, save your settings as a preset. I have organized mine by paper type, then size of the print and then whether the print is matted or not. You can easily create folders, save a preset and drag it to your customized folder. These presets save the printer settings so they are important. Creating these settings is beyond the scope of this article and will be covered in a later article.

Press Print

We are now ready to press print! If you have made these changes, your print should come out very close to what is on your screen. This is provided of course you have setup your system and calibrated it correctly. I strongly recommend using the printer preview in the R2400 driver until you feel confident you have your settings correctly. While it may not be a perfect translation, the preview will tell you if you are way off the mark.

Research on Printing in Lightroom

After printing several prints using various settings where Lightroom whereby Lightroom controlled the color management, I gave up. The prints either had such bright saturation that Velvia film looked dark and pale, or the prints contained strong magenta hues. Yes, I had the printer set to ICM and No Color Management. I believe it has to do with the wide gamut of the ProPhotoRGB color space and mapping to the printer driver through Lightroom.

The method I presented above uses the default Lightroom color space and allows the Epson driver to manipulate it. This process has provided very acceptable results to me using the various Epson Fine Art papers. I have not experimented yet with the Luster paper and other vendor's papers, partly because I try not to switch often between matte and photo black cartridges due to ink waste.

Here are some of the sources I used to arrive at these conclusions:
If you review these many say to let Lightroom manage the color. A few forums suggest we should let Epson manage the color. However, no one suggests that we set the input profile to the same one as Lightroom uses.

Let me know your experiences. ... Read More!

Don't forget to visit my photography web site where we sell museum quality black and white prints framed to last up to 175 years - Outdoor Images Fine Art.