Showing posts with label LR 2 Beta. Show all posts

Tuesday, July 29, 2008

Lightroom 2 is now Released!

Lightroom 2 is now here! Thank you to all the Adobe folks who have listened to so much bantering from the Beta version. There are many new improvements that were only hinted on in the Forums, so if you've been working with the Beta 2 version, you'll still have some new surprises in store!

You can go to the purchase page at Adobe or get a 30 day trial version.

Also, be sure to lookup some of the new feature videos from the Adobe Photogshop Lightroom 2 Learning Center.

Gotta go, time to buy my copy! ... Read More!

Don't forget to visit my photography web site where we sell museum quality black and white prints framed to last up to 175 years - Outdoor Images Fine Art.

Wednesday, July 2, 2008

Update: Custom Sorting in Lightroom 2.0 Beta

There is a work-around to the lack of custom sorting found in the Adobe Lightroom 2.0 Beta version. See the updated article Lightroom Tip#16 - Ordering Images in Lightroom where we give you this work-around. ... Read More!

Don't forget to visit my photography web site where we sell museum quality black and white prints framed to last up to 175 years - Outdoor Images Fine Art.

Friday, June 13, 2008

Lightroom 2: Cropping and Pixel Size

Cropping while maintaining a specific pixel size has been a continued hot topic on the Lightroom 2.0 Beta forums. After some exploration based on a post from Jao van de Lagemaat on the Lightroom Forum for the 2.0 Beta version, I found a way to show the pixel sizes directly on the screen while cropping. Here is an article to show you how to get that pixel size on your development module window setup.
http://www.blogger.com/img/gl.photo.gif
Add Image
First, bring an image up in the development module window. Then go to the View and View Options menu. See the example below:


After clicking on this menu item, you will get the following dialog:


Be sure to check the Show Info Overlay box at the top of the dialog. Otherwise, your changes will not show up. Second, go to the Image Info 2 section and change the bottom two items. Use the drop down box and select Cropped Dimensions and Megapixels.

There is no OK button, so just close the window.

Presto! You now see the size of the image in pixels and the combined size in Megapixels. Furthermore, when you crop an image, you can see the resulting crop in pixels without having to switch back to the Library module. See the example of an image crop in the Development window below:


While this isn't a fix for those that want to input an image density setting for cropping, it will allow you to get reasonably close with a little math, all on one screen.

Enjoy!

... Read More!

Don't forget to visit my photography web site where we sell museum quality black and white prints framed to last up to 175 years - Outdoor Images Fine Art.

Tuesday, June 3, 2008

Selecting Images with Multiple Keywords in LR 2

Adobe Lightroom 2 Beta has changed significantly the way we filter the catalog or library of images to find what we're looking for. In the process, the method of selecting images with multiple keywords has changed. Here I will show you two methods to get this done in Lightroom 2 Beta.

First, here are the assumptions in the Library:

1. There are four images with the keyword: farm
2. There is one image with the keyword: old farm
3. There are other images with neither keyword.

So the goal is to have the library only show images with the key words: farm and old farm.

Here's how we do it.

Using the Text Filter

First open the filter at the top of the library and click on the Text type. This is as opposed to Refine and Metadata. For the Text Type, choose Keywords and then choose Contains All. In the search box type 'farm' or whatever you are searching for. See the image below and you will notice that five images are shown - four with the keyword 'farm' and one with the keyword 'old farm'.


Note that if you are searching images containing multiple keywords that are different then separate them with spaces like the following:


If you are searching for images containing either of multiple keywords, change the type from Contains All to Contains like the following:


The Contains All and Contains logical types help control the use of the filter words. There are other filter types that can be used as well.

Using the Metadata Keyword Approach

Using the same filter in the Library as we did above, change the filter type to Metadata. Then in the left-hand column, choose the data type Keyword. When it opens, the 'All Keywords' item at the top will be highlighted. Go down and select two keywords by clicking on one with the mouse and another by holding the control (CTRL) key down and clicking with the mouse. See the example results below that match the same images using the Text filter previously:


Note that you can use the shift (SHFT) key and select a whole range of keywords consecutively, but I doubt that this would be used very often.

Conclusion

There are significantly more options available to search and filter a library. When thousands of images are included, this feature is very welcomed. The interface has changed significantly, but once you are used to the changes, is much more effective than in Lightroom 1.x. ... Read More!

Don't forget to visit my photography web site where we sell museum quality black and white prints framed to last up to 175 years - Outdoor Images Fine Art.

Thursday, May 8, 2008

Lightroom Tip#11-LR2 Filtering in Smart Collections

Adobe Lightroom 2.0 Beta included a new feature called Smart Collections. These collections are created automatically after setting some rules. The rules are very customizable and can filter based on certain data from your images. There is a trick to filtering for some words though that are contained within other words. If not properly entered in the filter, the smart collection will contain images that were not intended to be included.

When setting up a rule to filter on a word that is short, not very unique and can be part of other words, there is trick to follow. Take the example of a keyword 'rob' which is also contained in 'robby', 'robert', 'throb' and 'robin'. Simply setting the smart collection to contain 'rob' will filter in a lot of other images that were not desired.

The trick (or rather rule) is this: use the '+' sign in your filter text. The '+' sign, or plus sign, indicates either starts with or ends with depending on whether you place it at the beginning of a word or the end.

Thus, to filter out 'throb' in our example, use '+rob' as the filter. This will leave 'rob', 'robby', robbert' and 'robin'. To filter out everything except 'rob', use the '+' sign at both the beginning and the end. Thus, '+rob+' will filter out 'robby', 'robbert' and 'robin' in addition to 'throb'. Reading the translation of the filter you get 'starts with rob and ends with rob'.

Hope this helps!
... Read More!

Don't forget to visit my photography web site where we sell museum quality black and white prints framed to last up to 175 years - Outdoor Images Fine Art.

Wednesday, May 7, 2008

Wish - Synonymns - Use 'em or Drop 'em

Lightroom 1.x has long had synonyms that can be entered as part of the keyword structure. However, synonyms, while they can be exported with images and libraries, cannot be used in searches. This holds true in Lightroom 2.0 beta.

Synonyms help keep the keyword list smaller. In fact, synonyms are a incredible idea for Lightroom to use. However, we need to be able to search on them. As the keyword list gets larger and larger with big libraries, and keywords are deeper in a hierarchy, it becomes all too easy to forget which keywords are used.

In that case, searching for a similar term can make all the difference in finding an image. Please, Adobe, add the ability to search on the synonyms - especially since we already have them input!
... Read More!

Don't forget to visit my photography web site where we sell museum quality black and white prints framed to last up to 175 years - Outdoor Images Fine Art.

Thursday, May 1, 2008

Wish - Add Cropping to the Custom Develop Presets

Cropping is a very important part of image development and while Lightroom (both the 1.4.1 and beta 2.0 versions) allows for many variations in cropping, only five items can be saved as custom cropping sizes. For many photographers, this is not enough. Think of the simple home photographer that wants to print only 4x6, 5x7 and 8x10 prints. They would need six presets: 4x6, 6x4, 5x7, 7x5, 8x10, 10x8 in order to efficiently manage crops.

I have an idea that would make it easy to store as many cropping requirements as you would need. Let's use the custom preset creation.

Currently, Lightroom allows for a wide variety of develop module settings to be stored in a custom preset. Simply check the box and that setting is saved. Interestingly enough, cropping is not a choice.

Some schools would say that including cropping would defeat the universality of a development preset. That is true. However, there is no current way to store more than five preset cropping levels and, quite frankly, using a menu to store more than that would not be efficient.

The preset items, however, can be sorted and stored within folders making organization extremely easy. Consider the following workflow:

a) import an image.
b) apply a development preset to adjust contrast, colors, etc.
c) apply a cropping preset for say, 11x15
d) print the image to frame and hang
e) apply a cropping preset for say, 800x600
f) export the image as a 800x600px jpeg for the web
g) come back and apply a cropping preset for say, 8x10
h) print another copy of the image for a portfolio book to save.

All easy to do with a preset that only checks and saves the cropping. The other presets could be saved with everything but the cropping.

There may be another way to store infinite crop settings, but this was the one I could come up with. I hope we can add this functionality to Lightroom 2.0.
... Read More!

Don't forget to visit my photography web site where we sell museum quality black and white prints framed to last up to 175 years - Outdoor Images Fine Art.

Lightroom Tip#10-Cropping Images to Certain Pixel Sizes

I keep running across posts where someone wants to crop an image in Adobe Lightroom to a certain pixel size but doesn't know how to do it or believes it cannot be done within Lightroom. It can be done and you can crop an image to a certain pixel size. Here I will show you how to do it.

Keep in mind that if pixel size is important, then it should be for storing an image digitally. Printing an image to a certain pixel size is a more complex function that needs two variables: pixels in the image and the pixels per inch (or dots per inch) of the printing hardware. We will not be discussing printing images here, only exporting an image to a certain pixel size although this method can be applied to printing with a little more work and a calculator..

In order to export an image to a certain pixel size, use a combination of the cropping tool in the Develop module and the Exporting function under the File menu. First we will review the cropping necessary.

Cropping the Image for a Given Pixel Size


Select an image in the Library module to export to a certain pixel size. Then move to the Develop module and select the cropping tool. Select the aspect menu as shown above and click on the Enter Custom menu item.

You will get the dialog box shown at the left. Enter the crop size using the number of pixels to crop the image to. For example, to crop an image as 800px by 600px, enter 800 and 600 in the Custom Aspect Ratio. Note that this will not crop to a certain number of pixels, but it will crop to that aspect ratio. We will set the number of pixels later and using this aspect will avoid distortion or additional cropping of the image.


Next, crop the image using the aspect ratio just created. Either crop the image using the default frame size presented in the Lightroom workspace, or adjust the size smaller or larger. Adjusting the size of the crop will not alter our final image because we are setting the pixel size when we export. This step is only to set the correct relationship between height and width so that the final image output will be certain.

Exporting the File for a Given Pixel Size

After finishing the cropping, the last step is to export the file. Select the File menu from either the Development module or the Library, they are all the same File menu. Then click on the Export menu item. The dialog box shown will contain a variety of choices to export the image. The two items most important to keep the image a certain pixel size are the File Settings and Image Settings as shown below.


Select the image type to export. Use a JPEG, TIFF or other image type. Note that if you select ORIGINAL, then the Image Settings remain greyed out and cannot be changed. To select the original file type, force the File Settings to that type of image.

Then, using the Image Settings, select the checkbox Resize to Fit and be sure it is set to Width & Height. Then input the same width and height used in the custom crop. For example, input 800 and 600. Be sure the type is set to pixels.

Finally, export the image. This newly created image should be exactly the pixel dimensions input and should, more importantly, retain exactly the cropping that was set in the Develop module.

Conclusion

This method is not limited to pixels. The same concept can be used for inches or centimeters. By choosing the appropriate measurement for the export function that exactly matches the custom crop used, a specific image size can be achieved.

Note that this method also works in the Beta version of Lightroom 2.0. It would be reasonable to expect this will also work in the final version.

... Read More!

Don't forget to visit my photography web site where we sell museum quality black and white prints framed to last up to 175 years - Outdoor Images Fine Art.

Friday, April 25, 2008

Wish - Alt Key Override in Spot Removal

Adobe Lightroom uses an automatic placement when removing spots in an image. The placement of the sampled area in the image can be adjusted, but for images with a large amount of work, this is very tedious and inefficient. This idea would make spot removal as easy as it is in Photoshop.

This wish would be to have an Alt-key override in the spot removal. We could keep the default behaviour just as it is today. However, if a user were to hold the Alt key down, they could use the first click as a sample location and the second click as the spot to apply the healing. This is the same behaviour in Photoshop and has been proven as a best practice.

I would like to also see behaviour that remembers the offset from the last Alt key press and uses that offset for subsequent healing. However, that may be too much programming for an override process.

In any case, this would be an extremely efficient use and would keep me from feeling the need to export work to Photoshop for spot removal.
... Read More!

Don't forget to visit my photography web site where we sell museum quality black and white prints framed to last up to 175 years - Outdoor Images Fine Art.

Monday, April 14, 2008

Wish - Slideshow Export to DVD or Quicktime

Adobe has made significant advancements in the Beta version of Lightroom 2. One weak area of the program is the Slideshow module which has received a lot of attention during this beta test. The discussion has centered around ways to create better slideshows outside of Lightroom so that they can be viewed without the original computer. While the web module has it's own programming language and third parties have created a multitude of plugins for web work, the Slideshow remains stagnant. There has to be another solution.

How about creating additional exporting options? Instead of Flash, which can be done through the web interface, how about two other mediums: DVD's (CD's) or Quicktime Videos?

Wouldn't it be great to export a slideshow to a DVD and send that as a [b]final product[/b] to someone? They could view the wedding pictures in their album, but also on their TV. Or, you could finish a shoot on location, quickly work up the images and export to a DVD for others to view in the media center that already has a DVD player hooked up. What about sending a movie to a group you went on vacation with? How about charging extra for a video of the images a customer has already paid for in print? The uses are endless.

If straight to a DVD is too dificult to program, how about creating a quicktime or other type of video file such that we could us a third party burning software to create the DVD?

This concept would remove the problems associated with a slideshow in PDF format and make the program all that more useful and portable.

Let me know what you think.
... Read More!

Don't forget to visit my photography web site where we sell museum quality black and white prints framed to last up to 175 years - Outdoor Images Fine Art.

Thursday, April 10, 2008

Wish - Print to Email in Lightroom 2 Beta

I think adding the addition to print to a jpeg is a fantastic idea! Wouldn't it be great to simply add an item allowing us to print to an email?

Since we are on a multi-platform with Lightroom, it could simply call the operating system's email client and prepare the jpeg as an attachment. This would make sending contact sheets and other photos via email very easily accomplished. Besides, going paperless is a great GREEN idea!

Also, for bloggers that use an email account to automatically publish, an email could be sent with the photos to publish them on the web.

Great ideas Adobe! Can we add an email to print??
... Read More!

Don't forget to visit my photography web site where we sell museum quality black and white prints framed to last up to 175 years - Outdoor Images Fine Art.

Wish - Last Date Edited Metadata

There has been siginificant discussion on incremental backups in Lightroom and the need for that ability. I have a solution easy to implement that should work well. If we could add a metadata tag that was the date and time last edited, via development of some kind, or additional of snapshots, etc., then we could filter on that metadata and produce an export to cd or hard drive.

This would enable daily, weekly, or other timespanned backups. It would also leave all the work in lightroom.

What do you think?? Other ideas??
... Read More!

Don't forget to visit my photography web site where we sell museum quality black and white prints framed to last up to 175 years - Outdoor Images Fine Art.

Developed Image Backup in Lightroom

We discussed the backup of images into Lightroom once they were imported. Here we will discuss the backup of images once they have been developed or modified. Based on the volume of discussion in the Ligthroom Forum, we will also discuss whether additional backups are needed, or if these backups contain all the data we need in the even of catastrophe.
When we were backing up our image initially upon import, all we had was an image file to backup. If we were backing up a RAW file, then we performed a slightly different set of steps converting the file to a DNG, or digital negative format by Adobe. Now we are concerned with saving meta data as well as developed information. Below are the steps we have used and the results.

Exporting Developed Images for a Backup

First, we will choose a set of images to backup. This can be a directory, camera, portfolio or the entire ligthroom catalog. Select images in the same manner as you would to do anything else in Lightroom. Then we need to export the images. The setings we use here are particularly important. Since a RAW file contains so much data, we did our testing on a simple jpeg file from a Sony DSC W-7 which is a pocket digital camera. We wanted to use a compressed format knowing that RAW files would probably behave better. See the image below for the export dialog with our settings selected.
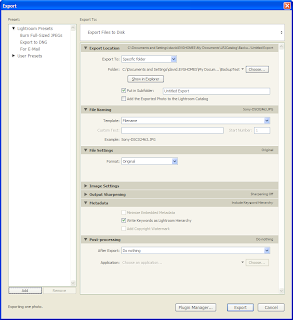

The first item is the export location. This can be a hard disk, temporary space, or some other location available in your computer. If you are storing your backup on a hard drive, choose this location, otherwise choose a temporary space to burn the images to a cd.

Next we set the filenaming. This is important so that we do not loose the original filenaming. If you are like me, you have adjusted the filename slightly because you have more than one import source - negatives and a digital camera or two digial cameras. Thus, you must choose Filename as the method for file naming this export. This selection leaves the filename exactly as it is with no modification, you have already modified it.

Next is the file settings. Lightroom defaults to the type of file that your image really is. In my case it defaulted to JPEG. Change this file type to original, especially if it is not a RAW file, otherwise some additional processing may ocurr and the results may not be your native, virgin file. Choosing the original file type disallows any Image Settings and Output Sharpening, which is what we want.

Next I choose to write the keywords as a lightroom hierarchy by selecting the checkbox. This ensures the keywords are stored with the image and I have spent significant time in my workflow setting keywords.

Finally, we set the post processing. In this test case I used do nothing, but in a real backup I would choose Burn Exported Images to a Disc.

Then we press the export button and wait for the backup to complete.

Testing the Backup

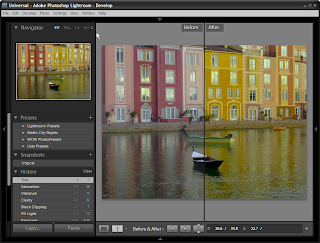
No backup routine is worthwhile unless it is tested. Here are the results of my testing a developed image backup. The first image shows a comparison in the develop module of an image. Notice there are clearly color enhancements to the image. Also note the library name at the top of the window is Universal. This is the image I exported using the settings above.

Next, I created a new, empty catalog in Lightroom and imported the image that was exported. See the window below for the results after opening the develop module and selecting compare.
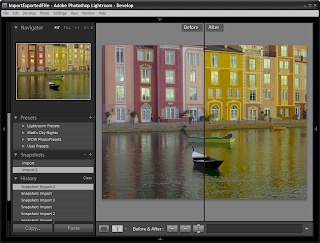

Notice several items. First, the title on the window indicates a new catalog, not the same one we used to export. This is an important step of the test to be sure no information left behind is used. We want to know if catastrophe strikes and we start from scratch what we will get. A better test would be to use a new computer with a new install, but this should provide accurate results as well.

Second, notice that the compare clearly shows adjustments to the image, which is what we expect. However, also notice that the original, untouched image is also available. See the snapshots panel on the left side. Notice that we have two snapshots. One is labeled import which is the original import and one is labeled import2 which is the second import done at the restore of the backup.

Conclusion

Several items worth noting. The settings for development adjustments are saved on an export as is the original image. The steps have been cleared however, and I can live with that. The original file is saved intact which is important to me.

Further testing must be done which I will post here on checking: 1) the metadata saved, 2) the keywords saved and 3) multiple snapshots saved.

Finally, several items will be given. One, the folder location will be different upon restore unless care is made to restore to the original folder locations before the backup was made. I can live with that and if good paper records are maintained, restoring to original locations will not be a problem. Second, the catalog previews will need rebuilt. I can also live with that because there is a tradeoff between storing thumbnails for thousands of images and rebuilding them. A restore will take considerable time and waiting for thumbnails is fine with me knowing I have all the information backed up I need to get to my starting point.

The conclusion? There are many different backup routines available as third parties. However, Lightroom provides a backup routine that can be used in our workflow that will work with minimal effort. It keeps all the information we need without losing original images and that is what we have to have. Everything else is icing on the cake and available with other programs and different workflows. The choice is yours, just remember to TEST, TEST, TEST.

Lightroom 2 Beta

The steps here have been confirmed with Lightroom 2 Beta and work the same producing the same results. ... Read More!

Don't forget to visit my photography web site where we sell museum quality black and white prints framed to last up to 175 years - Outdoor Images Fine Art.

Saturday, April 5, 2008

Lightroom 2 Beta - Where to Give Adobe Feedback

We need to know where to give Adobe feedback on this first beta release of Lightroom 2. They have setup a special forum at this location in order to take feedback: follow this link to get to the forum. By leaving comments, we can all contribute to the improvement of version 2! ... Read More!

Don't forget to visit my photography web site where we sell museum quality black and white prints framed to last up to 175 years - Outdoor Images Fine Art.

Wish - Detail Panel needs more flexible adjustment for screen size

Lightroom 2 Beta has a new Detail panel under the development module. The panel has been redesigned in an extremely positive way. We now have a small zoom window that is already at 1:1 so that we can view noise and sharpening changes without adjusting our main view. Also added is a much anticipated chromatic aberration section in between the noise and sharpening areas.

My wish is this: we need to find a way to show the entire detail section, by default in the development window. See the image below from a 20 inch monitor. The default setup for the development module doesn't allow the entire detail panel to show at one time.

Other panels have the same issue, but it is much less important than the Detail panel. With the addition of the thumbnail, your attention is on this area while you are adjusting sliders. It is difficult to see the results of the detail and masking sliders with only part of the preview showing.

Granted, Lightroom is so flexible that you can adjust the size of the panel at the bottom, or even hide it which gives plenty of room. The principle should be, however, that the default setup gives you most of what you need.

I think the fix here is simple and would add value no matter what screen size you have. If Adobe would take the three slider sections of the detail window and allow you to shift between each slider section, similar to the HSL / Color / Grayscale panel, two benefits would result:

1. each of the sliders: noise, chromatic aberration and sharpening, could be right underneath the thumbnail allowing efficient view and adjustment of the image (see example below), and
2. the entire area you are working on in the detail panel would be visible in the default development module setup.

I created a view to show what I would like to see. The first image is with the noise reduction selected:

This second image would be with the sharpening selected.

Notice how in each image the section we are working with is directly under the preview window. The alt key could still be held down and the masking and detail previews would show. I think this would be more efficient and more beneficial to a large number of people.

Give me your thoughts and let me know if you think this would be a valuable change as well.

... Read More!

Don't forget to visit my photography web site where we sell museum quality black and white prints framed to last up to 175 years - Outdoor Images Fine Art.

Lightroom 2 Beta Release 439142 Wish List

Adobe Lightroom 2 Beta has greatly enhanced the workflow and efficiency for digital photography and Beta releases tend to have work that still needs done. Below I am starting my list of wishes based on this first public Beta release. Feel free to comment and keep watching, I'll add more here!

Below is my wishlist for Lightroom 2 Beta 439142:


Click on each item above to see more about that wish. Let me know what you think too!

... Read More!

Don't forget to visit my photography web site where we sell museum quality black and white prints framed to last up to 175 years - Outdoor Images Fine Art.

Thursday, April 3, 2008

Lightroom 2 Beta Keeps Existing Settings

Adobe did a great job with continued upgrade support, even when you keep an old version on your machine. After installing version 2.0 beta, I found an interesting and very good side effect.

All my settings, templates and presets from version 1.3 were available in 2.0! This makes testing the beta that much easier!

I'm working on getting some images in a library and I'll keep you updated with some Library and Develop module information! The interface looks great and I can already tell there are some fantastic additions.
... Read More!

Don't forget to visit my photography web site where we sell museum quality black and white prints framed to last up to 175 years - Outdoor Images Fine Art.

Lightroom 2 Beta Installation

The installation of Lightroom 2 Beta was easy and went without a hitch. I wanted to be sure that I could operate the beta version along side the current stable 1.3 version and this is what I did.

I followed the installation prompts as Adobe set them out. Fortunately, Adobe defaulted the installation to a unique directory. Be sure to keep the installation out of your current working version or you will overwrite your working copy.

Another plus, was not having to worry about entering authorization codes. Since I have version 1.3 already installed on my machine, installing version 2.0 copied the files and then left us ready to go!

I have had zero problems running both version 1.3 and version 2.0 beta side by side, although not at the same time. You can run one version at a time, but I haven't found a way to run two versions simultaneously. Even clicking on the program icon will not start a second session with a different version. I'm sure this is by design.

More to come!

... Read More!

Don't forget to visit my photography web site where we sell museum quality black and white prints framed to last up to 175 years - Outdoor Images Fine Art.

Lightroom 2 Beta - Cannot Import Catalogs Yet


I was hoping to begin a review of Lightroom 2 Beta today by importing my catalog from version 1.3. Unfortunately, that feature isn't available yet. If you use the File, Import Catalog menu and choose a catalog file that is created in a version less than 2.0, then you get the dialog box above.

I guess I will import whatever pictures I currently have on my digital camera and go from there! I will post more in the upcomming days.
... Read More!

Don't forget to visit my photography web site where we sell museum quality black and white prints framed to last up to 175 years - Outdoor Images Fine Art.

Wednesday, April 2, 2008

Adobe Lightroom Version 2.0 Beta is Here!

Adobe has announced the release of a beta version for Lightroom 2.0! More importantly is the availability of the Beta to the public in general. As a registered Lightroom user you can use your existing key to install the Beta, which runs through August 2008. You can download the Beta version here at Adobe Labs and try it out.

There has been significant chatter since this release and a few of the new items are very interesting. However, the question begs: Will Adobe still work on and release version 1.4 (1.5??) to fix the last patch that had such big meta data problems? Or, will Adobe focus on 2.0?

Some of the great new enhancements in store for 2.0 include:


  • Two monitor support (where has this been!)

  • Tremendous upgrades to the slideshow and web gallery routines making them more efficient to use (they are already)

  • REAL sharpening on the print module


These are just a few of the items, view the Release Notes in order to see more.

I am downloading a copy now and will let you know what I find! ... Read More!

Don't forget to visit my photography web site where we sell museum quality black and white prints framed to last up to 175 years - Outdoor Images Fine Art.