We discussed the backup of images into Lightroom once they were imported. Here we will discuss the backup of images once they have been developed or modified. Based on the volume of discussion in the Ligthroom Forum, we will also discuss whether additional backups are needed, or if these backups contain all the data we need in the even of catastrophe.
When we were backing up our image initially upon import, all we had was an image file to backup. If we were backing up a RAW file, then we performed a slightly different set of steps converting the file to a DNG, or digital negative format by Adobe. Now we are concerned with saving meta data as well as developed information. Below are the steps we have used and the results.Exporting Developed Images for a Backup
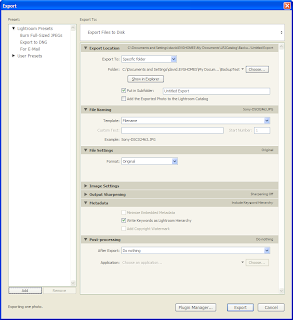
First, we will choose a set of images to backup. This can be a directory, camera, portfolio or the entire ligthroom catalog. Select images in the same manner as you would to do anything else in Lightroom. Then we need to export the images. The setings we use here are particularly important. Since a RAW file contains so much data, we did our testing on a simple jpeg file from a Sony DSC W-7 which is a pocket digital camera. We wanted to use a compressed format knowing that RAW files would probably behave better. See the image below for the export dialog with our settings selected.
The first item is the export location. This can be a hard disk, temporary space, or some other location available in your computer. If you are storing your backup on a hard drive, choose this location, otherwise choose a temporary space to burn the images to a cd.
Next we set the filenaming. This is important so that we do not loose the original filenaming. If you are like me, you have adjusted the filename slightly because you have more than one import source - negatives and a digital camera or two digial cameras. Thus, you must choose Filename as the method for file naming this export. This selection leaves the filename exactly as it is with no modification, you have already modified it.
Next is the file settings. Lightroom defaults to the type of file that your image really is. In my case it defaulted to JPEG. Change this file type to original, especially if it is not a RAW file, otherwise some additional processing may ocurr and the results may not be your native, virgin file. Choosing the original file type disallows any Image Settings and Output Sharpening, which is what we want.
Next I choose to write the keywords as a lightroom hierarchy by selecting the checkbox. This ensures the keywords are stored with the image and I have spent significant time in my workflow setting keywords.
Finally, we set the post processing. In this test case I used do nothing, but in a real backup I would choose Burn Exported Images to a Disc.
Then we press the export button and wait for the backup to complete.Testing the Backup
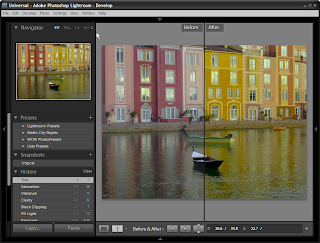
No backup routine is worthwhile unless it is tested. Here are the results of my testing a developed image backup. The first image shows a comparison in the develop module of an image. Notice there are clearly color enhancements to the image. Also note the library name at the top of the window is Universal. This is the image I exported using the settings above.
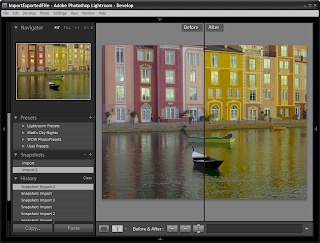
Next, I created a new, empty catalog in Lightroom and imported the image that was exported. See the window below for the results after opening the develop module and selecting compare.
Notice several items. First, the title on the window indicates a new catalog, not the same one we used to export. This is an important step of the test to be sure no information left behind is used. We want to know if catastrophe strikes and we start from scratch what we will get. A better test would be to use a new computer with a new install, but this should provide accurate results as well.
Second, notice that the compare clearly shows adjustments to the image, which is what we expect. However, also notice that the original, untouched image is also available. See the snapshots panel on the left side. Notice that we have two snapshots. One is labeled import which is the original import and one is labeled import2 which is the second import done at the restore of the backup.Conclusion
Several items worth noting. The settings for development adjustments are saved on an export as is the original image. The steps have been cleared however, and I can live with that. The original file is saved intact which is important to me.
Further testing must be done which I will post here on checking: 1) the metadata saved, 2) the keywords saved and 3) multiple snapshots saved.
Finally, several items will be given. One, the folder location will be different upon restore unless care is made to restore to the original folder locations before the backup was made. I can live with that and if good paper records are maintained, restoring to original locations will not be a problem. Second, the catalog previews will need rebuilt. I can also live with that because there is a tradeoff between storing thumbnails for thousands of images and rebuilding them. A restore will take considerable time and waiting for thumbnails is fine with me knowing I have all the information backed up I need to get to my starting point.
The conclusion? There are many different backup routines available as third parties. However, Lightroom provides a backup routine that can be used in our workflow that will work with minimal effort. It keeps all the information we need without losing original images and that is what we have to have. Everything else is icing on the cake and available with other programs and different workflows. The choice is yours, just remember to TEST, TEST, TEST.Lightroom 2 Beta
The steps here have been confirmed with Lightroom 2 Beta and work the same producing the same results.
Don't forget to visit my photography web site where we sell museum quality black and white prints framed to last up to 175 years - Outdoor Images Fine Art.


No comments:
Post a Comment