Showing posts with label archival. Show all posts

Saturday, February 23, 2008

Backing Up RAW Files

Backing up RAW files using the export and burn to cd functions in Lightroom should have a slight modification from backing up TIFFs or JPEGs.

The RAW format from digital cameras is different between many of the manufacturers. Adobe created an open source standard called a Digital Negative format or DNG.

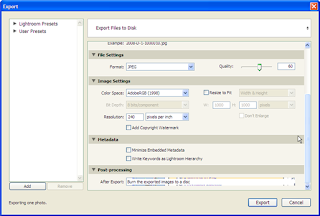
When backing up RAW images from my digital camera, a Leica DLux 3, I use the same settings as for TIFFs or JPEGs, but instead of choosing the file setting of Original, I choose DNG. Some new options are available when making this choice.


As the image above shows, you can choose to compress the image and add the original raw file. I use the compression because it is lossless and I choose not to keep the original RAW file. Your choices can be different and I would love to hear what others use.

The point is, choosing an open standard, especially if you believe in Adobe's digital imaging products, is good for the future of your image. Adobe has a history of keeping open source compatibility for a long period of time - look at the PDF or Acrobat file structure for proof of this claim.

I have a separate setting saved for backing up RAW files to DNG based on these settings.

NOTE: Here is an article from Adobe on the DNG standard they created and an article from NikonDigital.org also on the DNG standard.
... Read More!

Don't forget to visit my photography web site where we sell museum quality black and white prints framed to last up to 175 years - Outdoor Images Fine Art.

Export to CD or DVD for Backup

This is part of my Image Conversion Workflow.

Backup is a dreaded word because it doesn't seem to do anything except take time. However, backup is a most important word because without, your image is like carrying tissue paper beneath an umbrella in the rain - it will most likely get destroyed at some point.

Lucky for us, Adobe Lightroom has an excellent backup system built in. The export tab allows us to take pictures from our library and perform a variety of transformations. The export tab also allows us at the end to burn the results to CD or DVD.

Selecing Images to Backup

To begin the process, first select the images you wish to burn. The easiest way to do this is by selecting the folder containing the images you just imported. In the case of scanning slides or negatives, this should only be one folder. In the case of a digital camera, it may be several folders containing recent dates and times.

After selecting the folder, click on an image shown in the library group screen. If only one large image is shown, your are in the loupe view. Press G to go to the Group View (see the importance of learning lightroom shortcuts). Then press Ctrl-A or the menu item Edit, Select All. This will select the entire folder(s) for exporting to burn.

Exporting to CD Burner

Press the menu item File, Export to retrieve the following dialog:
Here is where the fun begins. First, set a location for a temporary burn. I created a subdirectory in my negatives directory called _DVDBurn. Then select the file naming convention. I use the template Filename which uses the exact same name on disk with no modification. This is important to use for a backup so that you can find the exact image you need later on. While the choices are wide and varied to manipulate the filename, this is best done when importing files and not while backing up.

The next choice is also important - file settings. You can choose JPEG or TIFF and it is tempting to do so, especially if that is the file type you are trying to backup. However, for our true backup purposes, choose Original to be sure you make a copy of the existing file without making the filesize larger than it has to be. You will notice then that the image settings are all greyed out. This is because we are using the original file type with no modification. Note that I make different choices when backing up RAW files from digital cameras.

The meta data settings are next. Make sure Write Keywords as Lightroom Hierarchy is checked for maximum compatibility.

Finally, the last setting is post-processing. Here we choose Burn the exported images to a disk. This is what actually makes the backup for us. Note that at the bottom of the dialog box, the number of images to export is shown. This is a good check to be sure it doesn't say one image, but about the number you expected.

Saving the Backup Settings

Since we have these settings the way we want them, save them so we can reuse them without having to check everything again. Press the Add button on the left and type in some meaningful name, like DVD Backup Original Images. You will see it added to the choices on the left. By clicking on it, you can apply those settings instantly. The presets function in Lightroom is available everywhere and highly useful.

Processing the Files

To continue, insert a CD or DVD in your disk burner and press the Exporting button. The upper left hand corner of the Lightroom window will show your progress. After the images are processed, a dialog box shows asking which burner to use. Note that if no writeable disk is inserted in a CD drive, then the Burn button is unavailable. Insert a blank CD or DVD and wait for the system to recognize it. Then the Burn button will be available. Also note that if your screen saver turns on in Windows, the dialog box might appear empty with no information or buttons on it after restoring the screen. By moving the mouse around the windows, the buttons and choices appear again. It must have to do with windows repainting the dialog box and that is a programming and operating system issue. I don't know if this happens in the mac operating system or not.

Naming the CD or DVD

After selecting the burner to use, you get another dialog box asking for the name of the first disk to use. Type any name you want using dashes between words. Also, only use a lone number '1' at the end. Lightroom will automatically increment this number for each disk. However, if you use 'Disk1' at the end, Lightroom doesn't know to increment the number and adds a dash and number to the end for the next disk - 'Disk1-2'. The solution is to use the format 'Disk-1' in which case Lightroom will increment the next disk to 'Disk-2'. I use the year and month of the images followed by a dash and number one. For example, images from February 22, 2008 would be 2008-02-22-1.

Writing the Disk

Lightroom will then process your images, write them to disk and, most importantly, verify the disk. While you can do other work in Lightroom while this process is going on, I find even with a dual 3.0mhz pentium and 4gb of memory that Lightroom is sluggish. I also don't want any trouble with my backup, so I just let the computer run it's course.

Finishing the Burn

Lightroom ejects the cd drawer when finished, so it's easy to look and see when the export is finished. Simply put another disk in, wait a moment to let the computer recognize it, and press the Continue button to burn the second and subsequent disks.

Always make backups of your images as soon as you import them. You will eventually lose something. About six years ago I had a network drive go bad with about 10 years of images on it. Some were not backed up and I permanently lost them. They were of my two boys and I'll never get them back. Learn from my mistake.

Technical Note

While I do not see it documented, it appears that Lightroom does empty the burn directory before starting each burn. Thus, while you have some leftover files between burns, they don't just keep stacking up losing your free disk space. I just leave the temporary files there and don't worry about it. ... Read More!

Don't forget to visit my photography web site where we sell museum quality black and white prints framed to last up to 175 years - Outdoor Images Fine Art.

Friday, February 22, 2008

Exporting Greyscale Files - Too Large?

Exporting greyscale images from Adobe Lightroom can at first seem to make the file larger. For example, I use TIFF images that come from scanning my black and white negatives. If I do a simple export from Lightroom and burn them to CD or DVD, my imaages are larger. How much larger? They go from 45mb to 133mb, or a factor of three.

Why Does the Filesize Triple?

The file size triples becuase the 16bit greyscale file is converted to 16bit RGB. This means one channel is converted to three channels. Do not be fooled, there is no more data than in the original file. In fact, all three channels, Red, Green and Blue have exactly the same data, unlike scanning a color image which results in different data for each channel. Since we haven't gained any new data, we have to determine how to get the filesize back to normal.

Maintaining Original Filesize

Observe the export dialog used to export library images to a disksource and copy to CD or DVD afterwards. There is a file settings section that frequently defaults to JPEG. My experiments started by using the TIFF selection since my original images are TIFF's.
However, notice the bottom item which is labled Original as shown in the picture to the left. This selection disables many of the choices underneath file settings like size and quality. This is because the Original setting does exactly that - it copies the original file, with no lightroom adjustments and no conversions from greyscale to RGB. The only items included would be any metadata that has been written directly to the file.

It is this Original setting that we have been looking for and the Original setting that we should use in order to keep the file in it's native form. The same is true of RAW files - the Original setting will copy the file as is and leave the RAW information unaltered.
... Read More!

Don't forget to visit my photography web site where we sell museum quality black and white prints framed to last up to 175 years - Outdoor Images Fine Art.

Friday, February 1, 2008

Physical Storage of Film & Slide Media

This is part of my Image Conversion Workflow.

After scanning negatives and slides and turning them into digital images, the media needs to be stored carefully. As we move to the digital age, this is increasingly more important if the negatives and slides are going to last. Several reasons support this careful storage.

First, because we will be handling the digital images, the physical media will not be handled for extremely long periods of time. This means moisture and acid can have a more quickly and devistating effect on the negatives and slides. Second, even with a DVD or CD backup, accidents and damage can occur causing the need to recan. Finally, batch scanning doesn't always inform us when a file may be corrupt until it is needed and not available. Thus, sometimes the only choice is to go back to the original media.

Slide Storage

Storage of slides should be acid free, moisture free and light free as much as possible. I use the 35mm slide storage system from Archival Methods.

This system provides small boxes that store an entire roll of processed slides. I label the top of the small box with the computer folder name assigned when scanning. For example, 2007-S-10 (see Digital Management of Slides and Negatives). Then I put a brief description on the front of the small box. Note that each slide also has the file number and the image number. Images have a surprising way of looking the same. It is important to be able to locate the exact slide based on the computer image file.

Each set of slides is then put in long boxes with lids where I label the range: 2007-S-1 to 2007-S-6. A large box with a drop down flap holds six of the long storage containers. All in all, one box holds 36 sets of slides. If each set has 30 slides, then one box would store about 1,000 slides.

The boxes are acid free and provide easy access and stackable storage.

Negatives

Negatives are more difficult to store as there is no standard cut size. Negative strips can be un-cut, cut in strips of 5, strips of 6 or some other variation. I use strips of 6 and put them in PrintFile 35mm negative preservers from Archival USA. I label the top of the sleves the same was as the slides: 2007-F-7. Then I put the sleves into PrinFile work boxes labeling the spine with the range of negatives.

These boxes provide a sealed environment for the negatives with easy protection and transportation.

Conclusion

Scanning images is only half the work to a permanent filing solution. As images are scanned, they are assigned a permanent file number. This number must be put on each of the physical media and then stored properly for long life and later usage. Setting up a proper method at the beginning will make managing thousands of images easy later on. ... Read More!

Don't forget to visit my photography web site where we sell museum quality black and white prints framed to last up to 175 years - Outdoor Images Fine Art.

Wednesday, January 16, 2008

Archival Framing

The second component of our process to provide you with Museum Quality Fine Art is using Special Framing Materials. All of our frames are black and all of our mat boards are white. The black aluminum frame is hand assembled remaining strong and light to avoid warping on larger sizes.


Then a special plate of Acrylite OP3 which is light weight and shatter resistant is placed into the frame. The Acrylite filters out 98% of harmful UV rays which can fade your photographs over time. This allows our Fine Art to last longer than photographs framed with glass not to mention this material ships much better than glass and is less fragile.


Next, your Fine Art photograph is sandwiched into a bright white hinged mat made with 100% cotton museum board. These 4 ply beveled mats use linen tape for the hinge helping to further seal your photograph. Archival clear photo corners are placed on the inside of the mat board to hold the Fine Art without actually attaching anything to the photograph. This keeps your Fine Art in its original mint condition.


After placing the hinged mat board containing the photograph into the frame behind the Acrylite, an Artcare Foamboard is placed into the frame stiffening the entire piece of art and protecting the back of the mat boards. The MicroChamber technology contained in the Foamboard protects your artwork from harmful effects of foan outgassing into the frame. All the surface papers on the Foamboard are acid-free and lignin-free. They also contain a 3% buffering agent to maintain an alkaline pH.


Finally, sealing your Fine Art in the frame, clips are place around the edges to keep everything taught in the frame and a wire hanger is hand attached from side to side enabling easy hanging of your photograph. Two foam dots are placed at the bottom back corners of the frame to protect your walls while the photograph is displayed.


Other cheaper framing methods could be used, but we strive for Museum Quality and long lasting Archival Fine Art. Our research has shown that using this framing method can add about 60% more to the life of a photograph.

... Read More!

Don't forget to visit my photography web site where we sell museum quality black and white prints framed to last up to 175 years - Outdoor Images Fine Art.

Archival Paper

As part of our process to provide you with Museum Quality Fine Art, we start with Special Archival Papers. These papers include a Luster Paper, a Velvet Paper and an UltraSmooth paper. Each has slightly different properties and advantages. Each also has a different archival life ranging from estimated lives of 75 years under glass to 175 years under a UV blocking material.


The Luster paper is the only resin coated paper we use. It has the shortest archival life of 75 years under glass and 100 years under UV blocking material. The advantage of the Luster paper is the finest level of detail in the photograph and the widest range of tones. The paper surface has a luster finish similar to what you might get from a portrait studio. The disadvantage is the shorter archival life.


Velvet paper is a 100% cotton rag paper with an acid free base to preserve the Fine Art images. Of all the cotton papers it has the hightest D-Max rating providing the most detail in the high light areas of the photographs. The paper also has a slight texture to the surface providing a Fine Art feel. The paper is estimated to last 61 years under glass and 125 years under UV blocking materials.


UltraSmooth paper is a 100% cotton hot press paper that is not only acid free but also pH buffered to preserve Fine Art for the longest period. The hot press surface gives it the highest level of detail in the photograph of any of the cotton papers. The surface is extremely smooth as the name suggests. The paper is estimated to last 108 years under glass and 175 years under UV protected material.


Each Fine Art photograph we offer lists the type of paper used for the print. We choose the paper based on the print size and the level of detail and constrast in the print. We strive to produce the longest lasting print with the best level of details and contrast.

... Read More!

Don't forget to visit my photography web site where we sell museum quality black and white prints framed to last up to 175 years - Outdoor Images Fine Art.