Thursday, February 28, 2008

Importing Images Into Lightroom

After scanning our images, importing the images into lightroom is the next step in our Image Conversion Workflow. Fortunately, Lightroom has a powerful and easy to use interface to accomplish our import.

By pressing the Import button at the bottom of the Library view or by using the File, Import Photos from Disk menu item, we choose a source for our images and access the dialog to the left. Note that you can bypass these menu items by dragging a folder or files from Windows Explorer directly onto the Lightroom Library. The import dialog box will open with those files already selected.

There are a plethora of options in this dialog box and all of the options are customizable. The power of this import workflow from Adobe is that after setting up some basics, importing becomes easy instead of a dreaded task.

We will cover these options over several articles as they are grouped in the dialog box. These are the File Location, File Naming and Information to Apply.

After importing our images, we will move on to applying metadata and keywords so that we can get the most efficiency out of our powerful new tool.

UPDATE: This article discusses the general concept of the import dialog box for Lightroom. We discuss a more detailed approach to importing of images, the backup process and any conversions desired in a new article: Backup, Import, Backup.
... Read More!

Don't forget to visit my photography web site where we sell museum quality black and white prints framed to last up to 175 years - Outdoor Images Fine Art.

Lightroom Tip #4 - Typing the Copyright Symbol in Lightroom

Typing the copyright symbol, or ©, in Lightroom is simple! Hold down the 'Alt' key on the keyboard and type 0, 1, 6 and 9 on the numberpad. Voila! The copyright symbol appears. If it doesn't work, be sure you are keeping the 'Alt' key pressed the entire time and use the numbers on the numberpad, not above the letters. UPDATED: Note that for the mac, the key press is option-g to type the © symbol. ... Read More!

Don't forget to visit my photography web site where we sell museum quality black and white prints framed to last up to 175 years - Outdoor Images Fine Art.

Lightroom Tip #3 - Using Quick Collection

Lightroom has redefined the way photographers can work with their images in one software package. This is primarily by separating the physical image file from how it is indexed or cataloged in the software. This has long been done by asset management software, but until now not done in the editing software as well.

This method of storage means an image can be called up in a variety of ways:

  1. Using the folder the image is stored in
  2. Using a keyword of the image
  3. Using some metadata of the image
  4. Using a collection containing the image


However, what if you just have a few images you are working on. Maybe a project that is pulling images from several sources. Say that you are putting on an exhibit of some images showing varied techniques to a group of students or for a seminar. You might need a simple collection you can work on and then export to a slideshow and be done.

Whatever the reason, a Quick Collection in Lightroom is a great tool to use. A quick collection is a temporary collection of images that are otherwise unrelated.

The shortcut keys are simple:

  • B - Add an Image to the quick collection
  • Control + B - View the quick collection
  • Del - Delete an image from the quick collection while viewing the collection

So how do we use the quick collection? Highlight an image or a few images and hit the 'B' key on the keyboard. Find a few more images, hitting the 'B' key on the keyboard each time. Then press the 'Control' and 'B' keys together on the keyboard. Suddenly you have a view of all these images together.

Here you can view them side by side or otherwise work with them as any group of images. You can export them to a catalog, to web images, to a slide show, print them, whatever you wish.

When you are finished with the group of images, you can press the 'Control', 'Shift' and 'B' keys to clear the quick collection or right click on the quick collection label under the Library.


If you want to save the collection permanently, you can right click on the quick collection label under the Library and choose 'Save Quick Collection' making it permanent.

However you use them, Quick Collections are a valuable tool you should learn to take advantage of. ... Read More!

Don't forget to visit my photography web site where we sell museum quality black and white prints framed to last up to 175 years - Outdoor Images Fine Art.

Backing Up Your Lightroom Catalog

When you open Adobe Lightroom, you should see the dialog below before the main window opens. The purpose of this well placed dialog is to ask if you want to backup your catalog.


Do not skip this dialog box! Your catalog is the lifeblood of Lightroom. All of your thumbnails and metadata is stored here. Hopefully, you have also allowed Lightroom to write the Metadata to your images, but this might not always be practical and some Photoshop files do not allow the writing of metadata. Note that this is typically due to leaving off the choice in Photoshop to maximize compatability when saving an image.

In this case, choose a location for your backup. This should be on a separate hard drive than the original catalog and preferably one that is not in your computer. This will allow you to disconnect and move the backup if your computer becomes corrupt. Lightroom saves your file location selection so that you do not have to choose it each time.

As others have stated on the web, it would be nice if Adobe would allow you to ask this question as you Exit Lightroom as well. Typically, this is just after all your new changes have been made and the point where you are most vulnerable to losing data.

One workaround would be to start Lightroom immediately after exiting to allow another backup to be made. You can then exit Lightroom a second time. This is inefficient, but then safety of your data is important.

NOTE: While I have not attempted this, my gut feel is that you could create a batch file in Windows (I don't know the equivalent in Apple OS) to start lightroom twice, once immediately after the first session. This might allow a single icon and single click to start the program twice, saving the catalog after a working session. I leave the work to others to post the results here.
... Read More!

Don't forget to visit my photography web site where we sell museum quality black and white prints framed to last up to 175 years - Outdoor Images Fine Art.

Wednesday, February 27, 2008

Cades Cove One Spring Evening - GSMNP


Cades Cove is located in the northwest corner of the Great Smokey Mountains National Park. Cades Cove is also my favorite spot to watch and photograph deer. I have spent many an evening there watching herds of deer go by. By herds I mean groups of deer numbering in the thirties.

This particular evening was in 1989. I remember it clearly because I brought a friend of mine along to share this spectacle of nature with. My friend Phil and I have backpacked among many of these mountains and seen our share of wildlife.

This evening I shot almost two rolls of slide film. The first roll went quickly in a field that backed up to some dense woods about 50 yards from where I perched. I had crawled in slowly with my camera and tripod. According to the distance scale on my lens, I was shooting pictures of deer between 50 and 80 feet away. To say it was intimate was an understatement. There were people around, but they were at least 100 feet behind me and everyone was quiet. This was nature at it's finest.

I slowly pivoted around from my vantage point and found a few deer eating in the field with some great lighting. The deer were in the shadows from one of the peaks and the mountains beyond were still lit by the sun. I pulled my camera around with me and tightened everything down, lens pointed straight ahead. I tilted the camera up to get a vertical shot showing the sunlit background. Then something happened that you cannot prepare for.

Something started the deer. It was a sound, although I cannot remember what the sound was. I just remember the adreniline rushing. The three deer were perfectly still, looking away from me. I was almost intruding on their gathering, but they didn't see me. I didn't disturb them. They weren't looking at me, the were looking at something else.

I had no idea what the exposure should be. I knew I had been shooting in the shade and that the deer were in the shade in spite of the sunlit background. I focused and shot off a few frames, worried that each shutter press would startle the deer further and lose the moment. It was so quiet the air almost felt solid and unmoving. I adjusted the exposure opening the aperture slightliy and shot off a few more frames. I was adjusting a third time when they returned to eating.

The moment was gone. It lasted only about ten seconds although it felt longer. At that time I had no idea whether I captured the image on film. I tried to shut my eyes and carve the image in my brain.

I still have the memory of that image - that moment and the feel of excitement to know I had an opportunity for a unique picture. As it turns out the slides came back great. I have applied the workflow I am recording here to this image. I have printed this image at 11x14 and hung it in my office. Whenever I need a moment to relax and pull together my thoughts, this image is where I turn. I hope you enjoy it too.
... Read More!

Don't forget to visit my photography web site where we sell museum quality black and white prints framed to last up to 175 years - Outdoor Images Fine Art.

Monday, February 25, 2008

Images on This Blog

In case you don't already know, the images on this blog are stored at higher resolutions. You can click on any picture and see it larger. For example, see the image below. It is of a dialog box and may be difficult to read on your screen.


However, if you click on it, you will pull up the image, full size and be able to readily view it. When you are done, click the back arrow to return to the article you were viewing. ... Read More!

Don't forget to visit my photography web site where we sell museum quality black and white prints framed to last up to 175 years - Outdoor Images Fine Art.

Saturday, February 23, 2008

Backing Up RAW Files

Backing up RAW files using the export and burn to cd functions in Lightroom should have a slight modification from backing up TIFFs or JPEGs.

The RAW format from digital cameras is different between many of the manufacturers. Adobe created an open source standard called a Digital Negative format or DNG.

When backing up RAW images from my digital camera, a Leica DLux 3, I use the same settings as for TIFFs or JPEGs, but instead of choosing the file setting of Original, I choose DNG. Some new options are available when making this choice.


As the image above shows, you can choose to compress the image and add the original raw file. I use the compression because it is lossless and I choose not to keep the original RAW file. Your choices can be different and I would love to hear what others use.

The point is, choosing an open standard, especially if you believe in Adobe's digital imaging products, is good for the future of your image. Adobe has a history of keeping open source compatibility for a long period of time - look at the PDF or Acrobat file structure for proof of this claim.

I have a separate setting saved for backing up RAW files to DNG based on these settings.

NOTE: Here is an article from Adobe on the DNG standard they created and an article from NikonDigital.org also on the DNG standard.
... Read More!

Don't forget to visit my photography web site where we sell museum quality black and white prints framed to last up to 175 years - Outdoor Images Fine Art.

Lightroom Window Loses Buttons

When exporting images in Microsoft Windows, which can take a considerable amount of time depending on size and volume, the screen saver will probably kick in. If you are burning these images to CD or DVD, then a dialog box comes up for each disk asking about burn information and disk naming.

After bringing the screen out of screen saver or hibernation, the dialog box may show, but now controls or text may be present.

Move the mouse over the dialog box and the buttons and drop down box will show again. However, only the active buttons will show. If no blank CD or DVD is in the burner, the Burn button will not show even when moving the mouse over the dialog box. Insert a blank CD or DVD, wait a moment and try again.

Note that none of the labels or text show, just the drop down box and buttons.

Everything appears to work fine and none of the export or burn appear lost. I assume this is an operating system and programming issue.
... Read More!

Don't forget to visit my photography web site where we sell museum quality black and white prints framed to last up to 175 years - Outdoor Images Fine Art.

Export to CD or DVD for Backup

This is part of my Image Conversion Workflow.

Backup is a dreaded word because it doesn't seem to do anything except take time. However, backup is a most important word because without, your image is like carrying tissue paper beneath an umbrella in the rain - it will most likely get destroyed at some point.

Lucky for us, Adobe Lightroom has an excellent backup system built in. The export tab allows us to take pictures from our library and perform a variety of transformations. The export tab also allows us at the end to burn the results to CD or DVD.

Selecing Images to Backup

To begin the process, first select the images you wish to burn. The easiest way to do this is by selecting the folder containing the images you just imported. In the case of scanning slides or negatives, this should only be one folder. In the case of a digital camera, it may be several folders containing recent dates and times.

After selecting the folder, click on an image shown in the library group screen. If only one large image is shown, your are in the loupe view. Press G to go to the Group View (see the importance of learning lightroom shortcuts). Then press Ctrl-A or the menu item Edit, Select All. This will select the entire folder(s) for exporting to burn.

Exporting to CD Burner

Press the menu item File, Export to retrieve the following dialog:
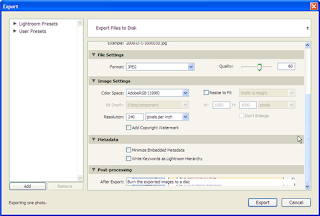
Here is where the fun begins. First, set a location for a temporary burn. I created a subdirectory in my negatives directory called _DVDBurn. Then select the file naming convention. I use the template Filename which uses the exact same name on disk with no modification. This is important to use for a backup so that you can find the exact image you need later on. While the choices are wide and varied to manipulate the filename, this is best done when importing files and not while backing up.

The next choice is also important - file settings. You can choose JPEG or TIFF and it is tempting to do so, especially if that is the file type you are trying to backup. However, for our true backup purposes, choose Original to be sure you make a copy of the existing file without making the filesize larger than it has to be. You will notice then that the image settings are all greyed out. This is because we are using the original file type with no modification. Note that I make different choices when backing up RAW files from digital cameras.

The meta data settings are next. Make sure Write Keywords as Lightroom Hierarchy is checked for maximum compatibility.

Finally, the last setting is post-processing. Here we choose Burn the exported images to a disk. This is what actually makes the backup for us. Note that at the bottom of the dialog box, the number of images to export is shown. This is a good check to be sure it doesn't say one image, but about the number you expected.

Saving the Backup Settings

Since we have these settings the way we want them, save them so we can reuse them without having to check everything again. Press the Add button on the left and type in some meaningful name, like DVD Backup Original Images. You will see it added to the choices on the left. By clicking on it, you can apply those settings instantly. The presets function in Lightroom is available everywhere and highly useful.

Processing the Files

To continue, insert a CD or DVD in your disk burner and press the Exporting button. The upper left hand corner of the Lightroom window will show your progress. After the images are processed, a dialog box shows asking which burner to use. Note that if no writeable disk is inserted in a CD drive, then the Burn button is unavailable. Insert a blank CD or DVD and wait for the system to recognize it. Then the Burn button will be available. Also note that if your screen saver turns on in Windows, the dialog box might appear empty with no information or buttons on it after restoring the screen. By moving the mouse around the windows, the buttons and choices appear again. It must have to do with windows repainting the dialog box and that is a programming and operating system issue. I don't know if this happens in the mac operating system or not.

Naming the CD or DVD

After selecting the burner to use, you get another dialog box asking for the name of the first disk to use. Type any name you want using dashes between words. Also, only use a lone number '1' at the end. Lightroom will automatically increment this number for each disk. However, if you use 'Disk1' at the end, Lightroom doesn't know to increment the number and adds a dash and number to the end for the next disk - 'Disk1-2'. The solution is to use the format 'Disk-1' in which case Lightroom will increment the next disk to 'Disk-2'. I use the year and month of the images followed by a dash and number one. For example, images from February 22, 2008 would be 2008-02-22-1.

Writing the Disk

Lightroom will then process your images, write them to disk and, most importantly, verify the disk. While you can do other work in Lightroom while this process is going on, I find even with a dual 3.0mhz pentium and 4gb of memory that Lightroom is sluggish. I also don't want any trouble with my backup, so I just let the computer run it's course.

Finishing the Burn

Lightroom ejects the cd drawer when finished, so it's easy to look and see when the export is finished. Simply put another disk in, wait a moment to let the computer recognize it, and press the Continue button to burn the second and subsequent disks.

Always make backups of your images as soon as you import them. You will eventually lose something. About six years ago I had a network drive go bad with about 10 years of images on it. Some were not backed up and I permanently lost them. They were of my two boys and I'll never get them back. Learn from my mistake.

Technical Note

While I do not see it documented, it appears that Lightroom does empty the burn directory before starting each burn. Thus, while you have some leftover files between burns, they don't just keep stacking up losing your free disk space. I just leave the temporary files there and don't worry about it. ... Read More!

Don't forget to visit my photography web site where we sell museum quality black and white prints framed to last up to 175 years - Outdoor Images Fine Art.

Friday, February 22, 2008

Storm Front Rapidly Moving Through


On monday a large storm front moved through the Charlott, NC region. The wind was blowing hard and the clounds kept coming in waves. They would string out in a long line and you could see where the change in temperature was in the atmosphere. The hot and cold spots along with the raving wind created these very fluffy and detailed clouds. There were ominous dark bottoms with bright spiking tops. These weren't tall thunderclouds that reach so high, but they were low and concentrated.

I was admiring them while driving down I-485 and I found a spot off one of the exits that was still natural looking. It had a high bank where I could perch and take the shot. I carry my Leica digital with me everywhere because you never know.

This shot was the fifth one I took. The sun was behind me and it was hard to find an angle that gave me the view of the clouds I wanted without putting my shadow in the picture. Eventually I squatted down and turned just enough to avoid the shadow.

This image was shot at 1/250 and f/8.0. Of course I converted it to black and white. The sharp whisps of the clouds standing out on the dark background of the sky is what makes this photo for me. It looks like we kept the rule of thirds all around (the sky vs. ground, trees vs. field, etc.). We even keep a little bit of the 'V' between the angle of the clouds and fence posts.

The only change I would make, would be a wider angle lens that could capture more of the clouds. All in all, a keeper.
... Read More!

Don't forget to visit my photography web site where we sell museum quality black and white prints framed to last up to 175 years - Outdoor Images Fine Art.

Exporting Greyscale Files - Too Large?

Exporting greyscale images from Adobe Lightroom can at first seem to make the file larger. For example, I use TIFF images that come from scanning my black and white negatives. If I do a simple export from Lightroom and burn them to CD or DVD, my imaages are larger. How much larger? They go from 45mb to 133mb, or a factor of three.

Why Does the Filesize Triple?

The file size triples becuase the 16bit greyscale file is converted to 16bit RGB. This means one channel is converted to three channels. Do not be fooled, there is no more data than in the original file. In fact, all three channels, Red, Green and Blue have exactly the same data, unlike scanning a color image which results in different data for each channel. Since we haven't gained any new data, we have to determine how to get the filesize back to normal.

Maintaining Original Filesize

Observe the export dialog used to export library images to a disksource and copy to CD or DVD afterwards. There is a file settings section that frequently defaults to JPEG. My experiments started by using the TIFF selection since my original images are TIFF's.
However, notice the bottom item which is labled Original as shown in the picture to the left. This selection disables many of the choices underneath file settings like size and quality. This is because the Original setting does exactly that - it copies the original file, with no lightroom adjustments and no conversions from greyscale to RGB. The only items included would be any metadata that has been written directly to the file.

It is this Original setting that we have been looking for and the Original setting that we should use in order to keep the file in it's native form. The same is true of RAW files - the Original setting will copy the file as is and leave the RAW information unaltered.
... Read More!

Don't forget to visit my photography web site where we sell museum quality black and white prints framed to last up to 175 years - Outdoor Images Fine Art.

Friday, February 15, 2008

Image Rating and Selection Workflow

Image rating and selection involves determining which pictures are best discarded and which have potential for future showing. This workflow also involves creating and maintaing portfolios. This is part of my Digital Image Workflow.

Rating and selection is in a constant state of flux. Some images will deserve rating changes over time as they grow on you or as you realize they were not as good as you originally thought.

Follow these steps:

  1. First Pass Selection of Discards and Rejects
  2. Second Pass Selection of Single Star Images
  3. Backup Rejected Images Workflow
  4. Third Pass of Double Star Images
  5. Color Coding Image Status
  6. Later Selection of Three, Four & Five Star Images
  7. Creating A Portfolio
  8. Changing Selections
... Read More!

Don't forget to visit my photography web site where we sell museum quality black and white prints framed to last up to 175 years - Outdoor Images Fine Art.

Wednesday, February 13, 2008

Lightroom Presets

Lightroom makes especially functional use of presets and templates (for web galleries). Photoshop allows a user to add preset tools in a list, but the presets are of all types and to find one a user has to scroll throughout the list looking for the correct tool.

Lightroom has various sections where presets can be stored and used, but each is unique to the module being worked in. For example, you can store templates or presets for meta data to attach to newly imported images. I use this template for my copyright and ownership information - i.e., information that should appear in every image no matter what.

There are also presets that can be saved for items such as custom cropping aspects. I use 11x14, 13x19 and 11x17 here.

Printing, slideshows and web layouts all have user definable presets or templates available. This makes repeat work in these areas a snap. The printing area I use the most and it is finally nice to have a way to set printing properties without having to reset the printer each time.
... Read More!

Don't forget to visit my photography web site where we sell museum quality black and white prints framed to last up to 175 years - Outdoor Images Fine Art.

Lightroom Shortcuts - A Must

Lightroom has an extensive set of shortcuts that aren't too difficult to learn. Adobe added an extra feature that makes using shortcuts a must. In any of the modules - Library, Develop, Slideshow, Print or Web, press the Help, Module Name Shortcuts, menu item and get a quick popup window with categorized shortcuts for the module you are in. Pressing escape or enter will cause the window to disappear.


It has never been so easy to find shortcuts. By making this easy, learning them is a cinch and they will become second nature in no time.
... Read More!

Don't forget to visit my photography web site where we sell museum quality black and white prints framed to last up to 175 years - Outdoor Images Fine Art.

Developing Pictures in Lightroom - Cropping

The second step I like to perform after making a virtual copy is a crop. If I know I will only print this picture in a certain format size, I will crop to that size. Most of the time I crop to a 1:1 aspect. This means that I trim off the edges.

Note that cropping is only necessary if an image is scanned from a slide or film. Digital images have no rough edges. However, cropping a scanned image also has the advantage of making the image more comparable to the digital images. After cropping, all the library images will look the same.

Another added benefit of cropping is that the image is ready to make a slideshow or html page. Even if further development is desired, the image can be used in a slideshow to proof.
... Read More!

Don't forget to visit my photography web site where we sell museum quality black and white prints framed to last up to 175 years - Outdoor Images Fine Art.

Developing Pictures in Lightroom - Virutal Copies

The first step I like to perform is based on a feature not found in photoshop - make a virtual copy. A virtual copy provides a good starting point to correct and modify an image and still have a copy of the original to view.

To make a virtual copy, just right click on a photo and choose virual copy. Notice that the copy has the bottom left hand corner turned up to indicate it is a copy. Also note that Lightroom automatically stacks the pictures.

Don't forget that virtual copies take little to no storage space because they are merely pointers to the original image. Lightroom's advantage to many programs is that it stores the steps necessary to produce the image, not the actual chanegs to the image. Multiple copies take up kilobytes rather than megabytes or gigabytes.
... Read More!

Don't forget to visit my photography web site where we sell museum quality black and white prints framed to last up to 175 years - Outdoor Images Fine Art.

Sunday, February 10, 2008

Lightroom Tip #2 - Solving Problems After Editing in Photoshop

When editing a picture in an outside editor, the view in Lightroom is updated automatically after finishing the external edit. This is true even if you think the image hasn't changed.

I use Photoshop for spot removal on negative and slide scans. I also use Photoshop for some specialized sharpening.

The problem is that after removing some additional scratches on a particular image in Photoshop and returning to Lightroom, the scratches were still showing. I tried deleting the library views and refreshing them. The scratches were still there.

I experimented and found that I had merged layers above the healing layers. I had sharpened that layer. Unfortunately, that layer then had a copy of the scratch in it, so the final image still contained the scratch. I deleted the merged layer and then recreated it and sharpened it. The scratch was gone.

After saving the file and returning to Lightroom, the scratch no longer appeared. Thus, the two lessons learned: 1) review all the layers in photoshop when makeing changes and 2) remember changes are immediately updated in Lightroom.
... Read More!

Don't forget to visit my photography web site where we sell museum quality black and white prints framed to last up to 175 years - Outdoor Images Fine Art.

Lightroom Tip #1 - External Programs

Lightroom has the ability to edit an image directly in Photoshop through the Photo menu and then Edit in Photoshop. Look at the next menu item and you see Edit in Other Application. This menu item can be customized to open any software and load the current picture. This includes any third party application or outside software.


Open the Lightroom Preferences and click on the External Editing tab as shown to the left. The second block has a button allowing you to find an executable and attach it as the external application. After choosing one, the menu item changes in Lightroom to indicate the program's name.

I use NeatImage's program for noise removal. I have added it as my external application. Now I can simply pull up an image for development, edit it in NeatImage directly from Photoshop, remove the noise and then finish development. Use whatever common program you use in addition to photoshop and have access from directly within Lightroom.
... Read More!

Don't forget to visit my photography web site where we sell museum quality black and white prints framed to last up to 175 years - Outdoor Images Fine Art.

Wednesday, February 6, 2008

Choosing a Film Scanner

Digital camera folks have it easy when it comes to taking a picture and then using it. Those of us who still use film have more work to do. While I'm not going to prove today that film still surpasses computer chips and CCD's in detail and tonal recording, I will assert that in today's photography even classic film shooters need to rely on a conversion to a digital image in order to effectively manage images. That conversion process is the subject here.

In my experience the choice of equipment is directly related to the successful transformation of film to digital image. Just like a photographer is going to choose the best equipment available, cutting corners on a scanning device will only ruin an otherwise great image on film. To that end, flat bed scanners should be removed from the equation. Using an 8 1/2 inch by 14 inch scanning bed for a 35mm negative is losing quality. Imagine taking the same amount of money and building a scanning device the size of a 35mm negative. Now that's a quality scanner.

So what parts of a scanner are important? In my opinion, three items need the utmost of careful detail.

  1. The optical quality of the scan (ppi or dpi)
  2. The quality of the light source
  3. The quality of the glass on the scanning bed

Optical Quality of the Scan

The optical quality refers to the natural optics and the ability of the scanner to turn an image into dots. Notice I said the ability of the scanner to create dots. Software interpolation, or turning a raw scan into dots through guesses in software, is best done outside of any actual scanning. Adobe photoshop has this ability and extensive research has been done on different methods for increasing picture sizes.

Instead, what is the raw scan? If the printing world uses 300 dpi (dots per inch) or 360 dpi, is that enough for a scan? My answer is: that is enough if you want prints the size of a 35mm negative. Scanning film this small and enlarging it to 13 x 19 inches is not difficult with the appropriate scan. My choice uses 4,000 dpi and creates a 45mb greyscale image or a 133mb rgb (red, green, blue) image. Note that the color image is three times the size of the greyscale image. This brings us to the second quality.

Quality of the Light Source

The light source is what penetrates the film and gives the scanner something to record. Any color scanning must have the ability to scan the red, green and blue layers of the image. This not only provides better detail of the image, it provides three layers of the image file.

Most good photography image software uses these three layers to manipulate the image into it's final form. For example, the blue layer produces the most noise, or spots, in an image. Thus, the noise reduction is frequently carried out the strongest in the blue layers.

Today's advances in LED technology allow for precise light sources that consume little power and have incredible long lives. This is my preference over other bulb sources.

Quality of the Scanning Glass

The final critical item is the glass that passes the scanning light through to the sensor. I believe glass is still used to protect the sensor and keep dust and dirt away as well as provide a surface to keep the film flat.

However, cheap glass produces aberrations in the scan. Good quality glass has the same characteristics as a quality camera lens. The glass is not as expensive as a lens because it is flat and not curved, but that doesn't mean it remains cheap. What it does mean, is that your various color layers will be produces with minimal error to the quality of the negative or slide.

Conclusion

Choosing a scanner is a lot like choosing a camera and lenses. We want the best quality for our money. This means choosing a scanner meant for film and photography. We didn't even discuss the important time savings for scanners that can load long strips of film or cartridges full of slides and scan unattended. These are features built into the best film scanners, so if you follow the rest of these guidelines, you will inherit the efficiency.

My scanner of choice is the Nikon Coolscan 5000 ED. This scanner fits the bill above and has a variety of attachments available for negatives and slides. However, there are other Nikon models available that allow for larger format negatives. I only shoot 35mm so the 5000 works well for me. Be prepared to spend some bucks, the 5000 costs about $1,000. However, remember this is the last line before you manipulate your image in a computer.

One of the other advantages of the Nikon scanners is the built-in Digitial ICE Technology. This technology along with others helps in reducing film grain effects and removing dust spots and scratches. This saves considerable post processing efforts. Unfortunately, this only works with color images.

Pick a quality scanner and you will end up with a quality digital image when put next to the original slide or negative. ... Read More!

Don't forget to visit my photography web site where we sell museum quality black and white prints framed to last up to 175 years - Outdoor Images Fine Art.

Tuesday, February 5, 2008

Moore's Cove - Pisgah National Forest

Today we took the kids and went up to Brevard, NC near where I grew up. We spent some time hiking in Pisgah at one of my favorite trail stops - Moore's Cove. This used to be a little known and hidden trail. It's at the second bride after Looking Glass Falls and now there is a small parking area and a wooden bridge across the stream.

Follow the path to the end through a few muddy spots and some long log bridges and you will find a waterfall. This small, but unique falls has a variety of waterflow depending on the season and how dry it is. Fortunately, this time the water was flowing well!

The falls comes down about 70 feet or so from a large rock outcropping. There is about 15 yards behind the falls that is dry and has plenty of sitting rocks. It is this area that interests me most. The rocks have a variety of mineral and sediment lines giving some interesting tones. Also, the light decreases further in and the sharp cuts out of the rock in certain places create sharp contrast further enhancing the tones.

I tried a variety of shots close up to the rock and further back allowing the light to play in each composition. After I get these developed, I'll add one here and discuss it.
... Read More!

Don't forget to visit my photography web site where we sell museum quality black and white prints framed to last up to 175 years - Outdoor Images Fine Art.

Photography Outings

The following is a list of some of my recent photography outings. After I develop and scan pictures from these outings I will post one of the pictures and analyze it for aesthetics as well as exposure.

  1. A Cat's Best Friend
  2. Old Building in Fresh Snow
  3. Lunar Conjunction with Venus and Jupiter
  4. New Frost for Winter
  5. Mt. Rainier at Paradise - Mt. Rainier National Park
  6. Moore's Cove - Pisgah National Forest
  7. South Charlotte - Storm Front Moving Through
  8. Cades Cove, GSMNP - One Spring Evening
... Read More!

Don't forget to visit my photography web site where we sell museum quality black and white prints framed to last up to 175 years - Outdoor Images Fine Art.

Sunday, February 3, 2008

Image Conversion Workflow

Image conversion workflow involves getting images ready for importing and organizing the physical media as well as the digital media. This is part of my Digital Image Workflow. Follow the steps below: (also review the discussion on Backing Up and Importing.)

  1. Label image set with the next index number
  2. Scan images onto hard drive
  3. Import images into library
  4. Identify Rejected Images
  5. Set metadata for images
  6. Set keywords for images
  7. Export to DVD or CD for backup
  8. Export to Secondary Hard Drive for Backup
  9. Print a Contact Sheet for filing with Negatives
  10. File all materials
... Read More!

Don't forget to visit my photography web site where we sell museum quality black and white prints framed to last up to 175 years - Outdoor Images Fine Art.

Digital Workflow Summary

Having a workflow is paramount to organization and efficient management of your images. I have developed a workflow for my film, slide and digital images. While the workflow is a continual work in progress, I will continue to update the steps listed here and the links attached.

10/24/2008 NOTE: With Lightroom 2 I have begun using Smart Collections to assist in the Digital Workflow. See the Smart Collection Workflow here.

  1. Image Conversion Workflow - The first step is getting the image into the library. Scanning, saving to disk, backing up, organizing and indexing negatives or slide sets are all part of this workflow.
  2. Image Rating and Selection Workflow - After importing images into a library, this workflow begins the selection process of which images should be discarded and which should be kept. Then the remaining images must be rated to further distinguish their value to you.
  3. Pre-Correction Image Workflow - After careful ratings, the best images should be prepared before the correction stage. This workflow applies necessary crops and any touchup required.
  4. Correction Image Workflow - This workflow determines which corrections should be evaluated for an image and the order to apply them. This workflow concentrates on Adobe Lightroom with external steps in Photoshop or other third party software.
  5. Printing Workflow - This workflow to get an image permanently displayed, this workflow deals with readying an image to print and saving profiles for reuse.
  6. SlideShow Workflow - This workflow involves creating a slideshow in Lightroom for display. This workflow is Lightroom specific.
  7. Web Workflow - This workflow involves creating a web page to publish or distribute on CD. Similar to the Slideshow Workflow, this workflow is Lightroom specific.
  8. Library & Catalog Management - This workflow is about maintenance. This workflow involves moving files to permanent storage or on separate hard disk media and maintaining the image and keyword data in the Library.
  9. Lightroom Preferences - This workflow involves setting Lightroom to take maximum advantage of the various preferences and maintaining backups of preferences, settings, presets and custom galleries.
  10. Backing Up Lightroom - This workflow discusses how to backup your Lightroom Settings making sure the time spent creating efficiencies and perfecting presets for your workflow is safe from the catastrophe that will someday happen.

Workflows can be generated for web and portfolio work, however if the images are well prepared, the majority of the workflow is selecting images and templates. ... Read More!

Don't forget to visit my photography web site where we sell museum quality black and white prints framed to last up to 175 years - Outdoor Images Fine Art.

Friday, February 1, 2008

Physical Storage of Film & Slide Media

This is part of my Image Conversion Workflow.

After scanning negatives and slides and turning them into digital images, the media needs to be stored carefully. As we move to the digital age, this is increasingly more important if the negatives and slides are going to last. Several reasons support this careful storage.

First, because we will be handling the digital images, the physical media will not be handled for extremely long periods of time. This means moisture and acid can have a more quickly and devistating effect on the negatives and slides. Second, even with a DVD or CD backup, accidents and damage can occur causing the need to recan. Finally, batch scanning doesn't always inform us when a file may be corrupt until it is needed and not available. Thus, sometimes the only choice is to go back to the original media.

Slide Storage

Storage of slides should be acid free, moisture free and light free as much as possible. I use the 35mm slide storage system from Archival Methods.

This system provides small boxes that store an entire roll of processed slides. I label the top of the small box with the computer folder name assigned when scanning. For example, 2007-S-10 (see Digital Management of Slides and Negatives). Then I put a brief description on the front of the small box. Note that each slide also has the file number and the image number. Images have a surprising way of looking the same. It is important to be able to locate the exact slide based on the computer image file.

Each set of slides is then put in long boxes with lids where I label the range: 2007-S-1 to 2007-S-6. A large box with a drop down flap holds six of the long storage containers. All in all, one box holds 36 sets of slides. If each set has 30 slides, then one box would store about 1,000 slides.

The boxes are acid free and provide easy access and stackable storage.

Negatives

Negatives are more difficult to store as there is no standard cut size. Negative strips can be un-cut, cut in strips of 5, strips of 6 or some other variation. I use strips of 6 and put them in PrintFile 35mm negative preservers from Archival USA. I label the top of the sleves the same was as the slides: 2007-F-7. Then I put the sleves into PrinFile work boxes labeling the spine with the range of negatives.

These boxes provide a sealed environment for the negatives with easy protection and transportation.

Conclusion

Scanning images is only half the work to a permanent filing solution. As images are scanned, they are assigned a permanent file number. This number must be put on each of the physical media and then stored properly for long life and later usage. Setting up a proper method at the beginning will make managing thousands of images easy later on. ... Read More!

Don't forget to visit my photography web site where we sell museum quality black and white prints framed to last up to 175 years - Outdoor Images Fine Art.

Digital Management of Negatives & Slides

This is part of my Image Conversion Workflow.

Every photographer has a method for storing images on a hard drive. I have taken methods from various sources including Mastering Landscape Photography by Alain Briot and The Adoboe Photoshop Lightroom Book by Martin Evening. Based on these sources and my experience, I offer the following formula you are free to use or modify.

Rule Number One: The directory structure is independent of any image organization other than finding a negative or a slide after scanning it.

First let's discuss film and slide image management. These image mediums need scanned whereas digital cameras create digital images to download and immediately use. Negatives and slides are created from a single roll of film. Before computers these were stored in protective sleeves or poly-propylene pages in a binder, but they were always stored by roll. You would have a hard time finding a photographer that would cut up his negatives and sort the frames by the type of picture.

Digital management of negatives and slides should be no different. Do not worry about selecting some frames on a negative and putting those scans in one directory while placing images of other frames in another. What if a frame has two different categories? Say an image has a waterfall with mountains in the background. Would this be filed under mountains or under waterfalls? This is what the Lightroom Library is for.

Instead, store the negatives and slides by rolls. I use the following structure: Year - F,S or D - Sequential Number. The year is first to help sorting in windows and allows me to catalog rolls of film by the year taken. Second, the letter 'F', 'S' or 'D' clues me in to what type of film images are in the directory: Film, Slides or Digital. Finally, I assign a number. Other than being an index, the number is meaningless. It is simply the next number in line. For example, the second roll of film I scan in 2008 will be called: 2008-F-2. Also, the second roll of slides I scan in 2008 will be called 2008-S-2. Note that I start with '1' for each type of film and move forward. This is because each of the three film types are physically stored in separate places. This will be discussed in a future article.

Thus, Rule Number Two: Use a directory structure of [Year] followed by the film type [F, S or D] followed by a sequential index number.

It is important not to stop with the directory organization. Follow up by marking the assigned number on the negative storage sheet or the slide boxes and slide frames. Write the full ID number on the storage sleeve. To continue our example above, label your negative sleeve with the shoot date, location, any other info you want to house and use an index number of 2008-F-2. For the slides, not only mark the storage container, but mark each slide with an index of 2008-S-2-# where '#' represents the scanned image number. This might be the same as the slide number or it might be different. I try to match slide numbers and frame number with the image id, but sometimes that is physically impossible. I also try to use the 'a' next to the frame number for negatives that are split between numbers.

Finally, Rule Number Three: label your film sheets and slides with the assigned directory name. Additionally, assign the image number with the directory name on each individual slide. This is the only assured way to locate the physical film when referencing a digitally scanned image.

Remember that once you have the image in Lightroom you can assign as many keywords as you like and these keywords are what you will use to find an image in the computer.
... Read More!

Don't forget to visit my photography web site where we sell museum quality black and white prints framed to last up to 175 years - Outdoor Images Fine Art.